What You Will Have at the End
You will start with two files:
When the script runs, it creates two more items automatically:
generated/: a folder containing files such as MUG-001-01.png.
manifest.json: a record showing which products completed, failed, or still need checking.
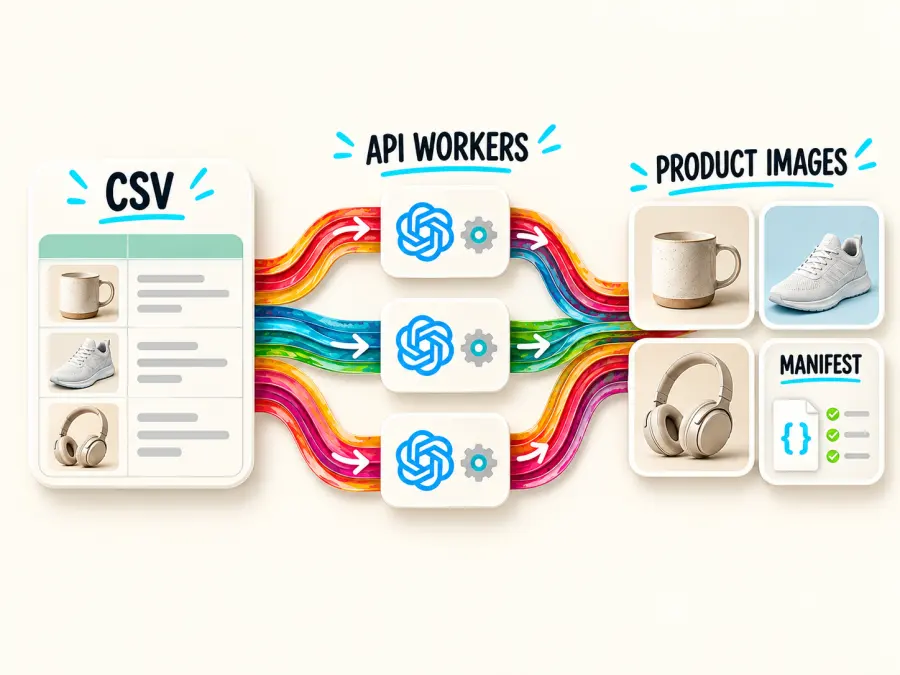
The flow is straightforward:
products.csv → Python script → GPT Image 2 API → downloaded images
                         ↘ manifest.json
Begin with the three sample products in this guide. Once they work, replace the sample rows with your real catalog.
Beginner Terms Used in This Guide
| Term |
Plain-English meaning |
| API |
A way for your script to send instructions to GPT Image 2 without using a chat window. |
| API key |
A private password that identifies your GPT Proto account and authorizes API usage. |
| SKU |
Your own unique code for one product, such as MUG-001. It is also used in the output filename. |
| Request |
One message sent by the script to the API. In this workflow, one product normally creates one generation request. |
| Task or prediction ID |
The receipt number returned after a generation request is accepted. The script uses it to check the result. |
| Polling |
Asking the result endpoint every few seconds whether a task has finished. |
| Concurrency |
The number of products being processed at the same time. Three workers means up to three active jobs. |
| Manifest |
A local record of every SKU, task ID, result, and error. It allows a stopped script to continue safely. |
| Base64 |
Image data represented as a long text string. It must be decoded before it becomes a normal image file. |
The API workflow is similar to collecting an order from a restaurant. The first request places the order. The returned task ID is the collection number. Polling checks whether the order is ready. The output URL is where the finished item can be collected. The manifest is your receipt book.
Can ChatGPT Generate Multiple Product Images at Once?
ChatGPT can create multiple images across a conversation, so it is fine for visual exploration and a small number of manual variations. It is not a dependable catalog pipeline: there is no CSV queue, stable SKU-to-file mapping, concurrency control, or retry manifest.
The API is the better fit when the question is “How do I create multiple product images and know which file belongs to which product?”
| Need |
ChatGPT interface |
GPT Image 2 API workflow |
| Explore one concept |
Good fit |
Possible, but more setup |
| Process a CSV catalog |
Manual |
Automated |
| Use a different prompt per SKU |
Repetitive |
One row becomes one request |
| Control filenames and folders |
Manual download |
Deterministic naming |
| Resume failed work |
Manual review |
Manifest-based |
| Integrate with a DAM, PIM, or store |
Limited |
Designed for code integration |
Searches such as “ChatGPT generate multiple images at once” often mix two different goals: several variations of one prompt and many images for different products. The distinction matters once cost, file ownership, and reruns enter the picture.
What “GPT Image 2 API Batch” Can Mean
People use “batch” for three separate patterns:
1. Several variations from one prompt
Set n between 1 and 10. This is useful when a designer wants several candidates for the same product and composition. It does not create product-specific prompts for ten SKUs.
2. Several independent requests at the same time
Read multiple products from a file and submit one request per row. A small ThreadPoolExecutor provides controlled concurrency. This is the pattern used in this tutorial because each product can have its own name, color, material, angle, and background.
3. OpenAI's asynchronous Batch API
OpenAI's direct Batch API accepts JSONL request files, uses a separate rate pool, offers a 50% discount, and completes within a 24-hour window. The OpenAI Batch API guide lists /v1/images/generations and /v1/images/edits as supported endpoints.
That is a separate OpenAI feature. Do not assume the same JSONL Batch endpoint exists on GPT Proto. The GPT Proto workflow below uses its documented image endpoint and prediction-status route.
What You Need
You need a computer, Python 3, a GPT Proto API key, and a text editor. Visual Studio Code is convenient, but any editor that saves plain-text files will work.
1. Check that Python is installed
Open Terminal on macOS or Linux, or PowerShell on Windows, and run:
python --version
If Windows says that python is not recognized, try:
py --version
A result such as Python 3.11.8 means Python is ready. If neither command works, install a current Python 3 release and enable the option that adds Python to your system path.
2. Create a project folder
Create a folder named gpt-image-bulk. Inside it, create these two empty files:
bulk_product_images.py
products.csv
Paste the complete Python script from this guide into the first file. Paste the sample CSV shown below into the second file. Both files must be in the same folder unless you change the paths in the script.
3. Create and store your API key
Create an account on GPT Proto, add credit, and generate an API key. An API key should be treated like a password. Do not publish it in an article, upload it to GitHub, or paste it directly into the Python file.
Store the key temporarily in an environment variable. On macOS or Linux, run:
export GPTPROTO_API_KEY="your-key-here"
On Windows PowerShell, run:
$env:GPTPROTO_API_KEY="your-key-here"
The variable normally lasts for the current terminal window. If you close that window and open another one, set it again before running the script.
4. Install the one required Python package
The script uses requests to communicate with the API and download images. Install it with:
python -m pip install requests
Windows users who needed the py command should run py -m pip install requests instead.
5. CSV에 제품 추가하기
CSV는 “쉼표로 구분된 값”을 의미합니다. Excel, Google Sheets 및 대부분의 카탈로그 도구에서 내보낼 수 있는 간단한 스프레드시트 형식입니다. 행당 제품 하나를 추가하세요:
제품당 한 행으로 products.csv를 만드세요:
sku,name,color,material,angle,background,avoid
MUG-001,쌓을 수 있는 커피 머그,무광 네이비,스톤웨어,3/4 뷰,부드러운 따뜻한 회색,증기나 손
BAG-014,컴팩트 크로스바디 백,포레스트 그린,페블드 레더,정면 3/4,밝은 베이지,소품이나 모델
LAMP-207,휴대용 테이블 램프,크림,분체 도장 알루미늄,정면,깨끗한 흰색,눈에 띄는 케이블이나 추가 물체
각 열에는 하나의 역할이 있습니다:
| 열 |
입력할 내용 |
예 |
sku |
고유한 제품 코드 |
MUG-001 |
name |
간단한 제품 이름 |
쌓을 수 있는 커피 머그 |
color |
정확한 눈에 보이는 색상 또는 마감 |
무광 네이비 |
material |
주요 눈에 보이는 소재 |
스톤웨어 |
angle |
원하는 카메라 뷰 |
3/4 뷰 |
background |
카탈로그 배경 |
부드러운 따뜻한 회색 |
avoid |
이미지에 포함되어서는 안 되는 물체나 실수 |
증기나 손 |
Python 스크립트가 해당 열 이름을 찾기 때문에 헤더 행을 표시된 그대로 유지하세요. 모든 SKU는 고유해야 합니다. 제품 이름이나 필드에 쉼표가 포함된 경우 올바르게 인용되도록 스프레드시트 프로그램에서 파일을 내보내세요.
각 행마다 다른 긴 프롬프트를 작성하기보다 짧고 사실적인 필드를 사용하세요. 스크립트가 동일한 사진 규칙으로 필드를 결합하므로 카탈로그가 일관되게 보이는 데 도움이 됩니다.
1단계: 재사용 가능한 제품 프롬프트 만들기
제품 프롬프트는 SKU별로 변경되는 사실과 전체 카탈로그에 적용되는 규칙을 분리해야 합니다. 이렇게 하면 프롬프트 수정을 측정할 수 있습니다: 공유 템플릿을 한 번 변경하고, 작은 테스트 세트를 다시 생성한 다음, 이전 버전과 비교하세요.
def build_prompt(row):
    return f"""카탈로그 제품 사진 한 장을 생성하세요.
제품: {row['name']}
색상: {row['color']}
소재: {row['material']}
뷰: {row['angle']}
배경: {row['background']}

제품이 사실적인 비율과 소재 질감을 유지하며 중앙에 오도록 하세요.
부드러운 스튜디오 조명, 자연스러운 접촉 그림자, 여유 있는 크롭 안전 공간을 사용하세요.
텍스트, 로고, 라벨, 사람, 추가 물체는 없습니다.
또한 피하세요: {row.get('avoid', 'none')}.
콜라주나 콘택트 시트가 아닌 단일 제품 이미지를 반환하세요."""
모든 제품에 대해 이 함수를 편집할 필요는 없습니다. 스크립트가 머그 행을 읽으면 {row['name']}는 쌓을 수 있는 커피 머그가 됩니다; 가방 행을 읽으면 동일한 자리표시자가 컴팩트 크로스바디 백가 됩니다. 이것을 템플릿이라고 합니다: 제품 데이터가 변경되는 동안 구조는 동일하게 유지됩니다.
“단일 제품 이미지” 지침은 모델이 요청을 콜라주로 바꾸는 것을 방지하는 데 도움이 됩니다. 카메라 뷰, 크롭, 조명, 그림자 및 배경에 대한 공유 지침은 개별 제품이 관련 없는 이미지가 아니라 하나의 카탈로그처럼 보이도록 도와줍니다.
초기 결과가 일관되지 않으면 먼저 공유 규칙을 편집하세요. 예를 들어 “여유 있는 크롭 안전 공간”을 “제품이 정사각형 캔버스의 약 75%를 채워야 합니다.”로 바꾸세요. 전체 파일에 적용하기 전에 세 가지 다른 제품 유형에서 해당 변경을 테스트하세요.
실제 브랜드 제품의 경우 텍스트 투 이미지는 컨셉 샷이나 일반 상품에 가장 적합합니다. 정확한 형상, 포장 또는 라벨 배치가 중요하다면 승인된 제품 참조를 사용한 이미지 편집을 사용하세요; 해당 워크플로는 나중에 다룹니다.
2단계: 대기열을 시작하기 전에 제품 하나 테스트하기
제품 하나로 시작하세요, n=1, quality="low", 그리고 1024x1024 같은 일반적인 크기를 사용합니다. 낮은 품질은 최종 품질로 생성하는 비용을 지불하기 전에 구도를 확인하는 데 유용합니다.
다음 cURL 명령은 작은 API 테스트입니다. cURL은 웹 요청을 보내는 명령줄 도구입니다. 이 명령은 Bash 문법을 사용하므로 API 키를 설정한 후 macOS 또는 Linux의 Terminal에 붙여넣으세요. Windows 초보자는 수동 cURL 테스트를 건너뛰고 이 가이드 뒤에 나오는 크로스 플랫폼 Python 스크립트를 사용해도 됩니다.
curl --request POST \
  --url "https://gptproto.com/api/v3/openai/gpt-image-2/text-to-image" \
  --header "Authorization: Bearer $GPTPROTO_API_KEY" \
  --header "Content-Type: application/json" \
  --data '{
    "prompt": "A centered matte navy stoneware coffee mug, three-quarter catalog view, soft studio light, warm gray background, natural contact shadow, no text or props",
    "n": 1,
    "quality": "low",
    "size": "1024x1024",
    "enable_sync_mode": false,
    "response_format": "url"
  }'
중요한 줄의 의미는 다음과 같습니다:
| 필드 |
의미 |
Authorization |
요청을 보내는 계정을 GPT Proto가 알 수 있도록 개인 API 키를 전송합니다. |
prompt |
원하는 제품 이미지를 설명합니다. |
n: 1 |
이 프롬프트에 대해 결과 하나를 요청합니다. |
quality: low |
첫 테스트에는 비용이 더 낮은 초안 설정을 사용합니다. |
size: 1024x1024 |
정사각형 이미지를 요청합니다. |
enable_sync_mode: false |
생성이 끝날 때까지 요청을 열어 두는 대신 작업 영수증을 먼저 반환합니다. |
response_format: url |
이미지가 준비되면 다운로드 링크를 반환합니다. |
성공적인 첫 응답은 data.id에 예측 ID가 포함된 JSON 객체입니다. JSON은 API에서 사용하는 구조화된 텍스트 형식일 뿐입니다. 다음과 같은 축약된 예시처럼 보일 수 있습니다:
{
  "data": {
    "id": "abc123",
    "status": "created",
    "urls": {
      "get": "https://gptproto.com/api/v3/predictions/abc123/result"
    }
  }
}
이 응답은 이미지가 아닙니다. 작업이 접수되었음을 확인하는 응답입니다. 반환된 실제 ID를 복사한 다음 그 결과를 조회하세요:
curl --request GET \
  --url "https://gptproto.com/api/v3/predictions/abc123/result" \
  --header "Authorization: Bearer $GPTPROTO_API_KEY"
다음 값을 바꾸세요: abc123 을(를) 작업 ID로. 만약 data.status가 아직 created 또는 processing이면 몇 초 기다린 후 GET 명령을 다시 실행하세요. completed가 되면 data.outputs에 생성된 출력이 포함됩니다. 전체 Python 스크립트가 이러한 검사를 자동으로 수행하므로 모든 제품에 대해 이 수동 과정을 반복할 필요가 없습니다.
현재 요청 및 응답 필드는 GPT Proto GPT Image 2 텍스트-이미지 참조를 참조하세요.
제품 하나가 다음 검사를 통과할 때까지 전체 카탈로그를 시작하지 마세요:
잘린 이미지가 모든 스토어프런트 배치에 충분한 여백을 남깁니다.
색상과 재질이 의도된 용도에 충분히 가깝습니다.
배경과 접촉 그림자가 카탈로그 스타일과 일치합니다.
임의로 만들어진 로고, 라벨, 소품 또는 중복 제품이 나타나지 않습니다.
결과 경로와 다운로드 코드가 모두 사용자 환경에서 작동합니다.
테스트가 401 Unauthorized를 반환하면 가장 먼저 API 키와 Authorization 헤더를 확인하세요. 403을 반환하면 모델 액세스와 계정 잔액을 확인하세요. 이 항목 하나에 대한 테스트가 성공할 때까지 전체 카탈로그로 계속 진행하지 마세요.
3단계: “크기는 16의 배수여야 합니다” 오류 방지
GPT Image 2는 일반적인 프리셋과 유효한 사용자 지정 치수를 허용합니다. 사용자 지정 크기의 경우 양쪽 변이 16의 배수여야 하고, 가장 긴 변은 3,840픽셀을 초과할 수 없으며, 종횡비는 3:1을 초과할 수 없고, 이미지는 655,360~8,294,400픽셀을 포함해야 합니다. 총 해상도가 2560×1440을 초과하는 출력은 API 문서에서 실험적 기능으로 표시됩니다.
“양쪽 변이 16의 배수여야 합니다”는 너비와 높이가 각각 나머지 없이 16으로 나누어져야 한다는 뜻입니다. 1024, 1200, 1536, 2048 같은 숫자는 이 검사를 통과합니다. 1000 같은 숫자는 통과하지 못합니다. 이 규칙은 가장 긴 변뿐만 아니라 너비와 높이 모두에 적용됩니다.
유료 요청을 보내기 전에 검증하세요:
def validate_size(size):
    if size == "auto":
        return

    width, height = map(int, size.lower().split("x"))
    pixels = width * height

    if width % 16 or height % 16:
        raise ValueError("GPT Image 2 width and height must be multiples of 16")
    if max(width, height) > 3840:
        raise ValueError("The longest edge cannot exceed 3840 pixels")
    if max(width, height) / min(width, height) > 3:
        raise ValueError("Aspect ratio cannot exceed 3:1")
    if not 655_360 <= pixels <= 8_294_400:
        raise ValueError("Total pixels are outside the supported range")
1200x1200은 양쪽 변이 16으로 나누어지므로 유효합니다. 1000x1000은 유효하지 않습니다. 스토어프런트에서 최종적으로 1000x1000이 필요하다면 1024x1024로 생성한 후 승인 후 크기를 조정하세요.
지원되는 프리셋에는 1024x1024, 1536x1024, 1024x1536, 2048x2048, 2048x1152, 3840x2160, 그리고 2160x3840이(가) 포함됩니다.
4단계: 무한 루프가 아닌 제어된 동시성을 사용하세요
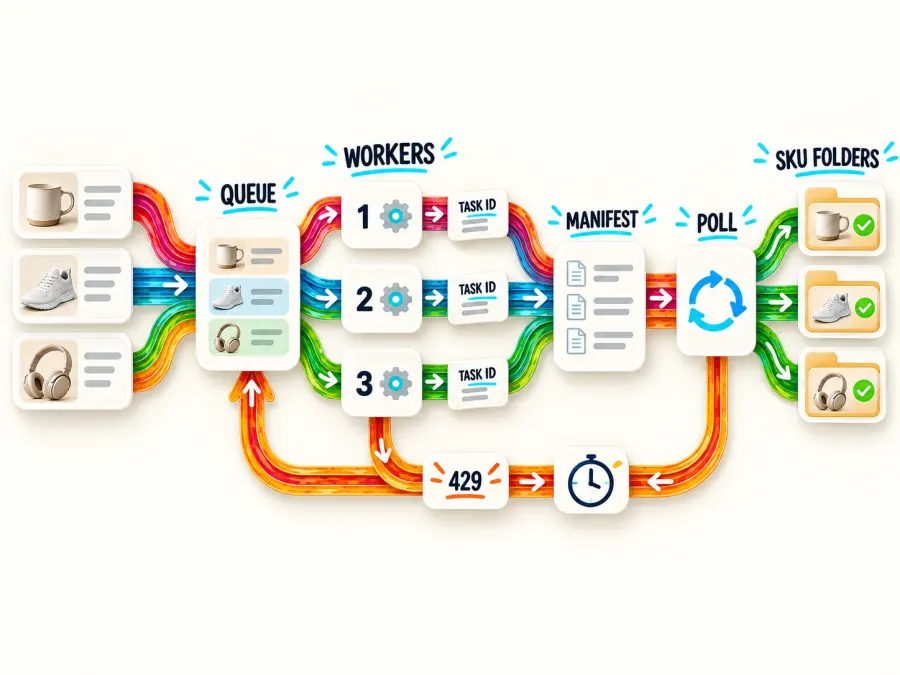
동시성은 스크립트가 동시에 처리하는 제품 수를 의미합니다. 작업자를 계산대라고 생각해 보세요. 작업자 하나는 활성 제품 하나를 처리하며, 작업자 세 명이면 최대 세 제품이 시스템을 함께 통과할 수 있습니다.
수백 개의 작업자를 시작하는 루프는 속도 제한에 부딪히고, 메모리를 소모하며, 실패 복구를 어렵게 만들 수 있습니다. 두세 개로 시작하세요. 계정 동작과 완료 시간을 확인한 뒤에만 늘리세요.
from concurrent.futures import ThreadPoolExecutor, as_completed

with ThreadPoolExecutor(max_workers=3) as pool:
    futures = [pool.submit(process_product, row) for row in products]
    for future in as_completed(futures):
        print(future.result())
이 예제를 사용하기 위해 Python 스레딩을 이해할 필요는 없습니다. max_workers=3가 중요한 설정입니다. 만약 반복해서 429 오류가 발생하면 2 또는 1로 줄이세요. 긴 테스트가 속도 제한 오류 없이 실행된다면 더 큰 값을 신중하게 시도해 볼 수 있습니다.
모델 제공자가 공개한 속도 제한이 중개 API 계정의 한도와 자동으로 같지는 않습니다. 활성 GPT Proto 키의 기준으로 429 Too Many Requests 및 해당 Retry-After 헤더를 신뢰하세요. 코드에 공격적인 숫자를 하드코딩하지 말고 동시성을 구성 가능하게 유지하세요.
OpenAI는 직접 모델 액세스에 대한 티어 기반 한도도 공개합니다. 해당 수치는 유용한 참고 자료이지만 GPT Proto의 속도 제한으로 제시되어서는 안 됩니다.
5단계: URL 및 Base64 결과를 올바르게 저장하세요
GPT Proto는 response_format="url" 및 response_format="b64_json"를 이 엔드포인트에 대해 지원합니다.
초보자는 먼저 url을 사용해야 합니다. API는 일반 이미지 링크를 반환하며, 스크립트는 파일을 generated 폴더에 다운로드합니다. 결과 URL은 영구 자산 저장소가 아니라 전달 링크이므로 즉시 다운로드하세요. 승인된 파일은 자체 제품 미디어 폴더, DAM 또는 객체 스토리지에 저장하세요.
Base64는 동일한 이미지를 전달하는 또 다른 방법입니다. 응답에는 URL 대신 매우 긴 텍스트 문자열이 포함됩니다. 시스템이 모든 데이터를 JSON 안에 유지해야 할 때 유용하지만, 파일을 열기 전에 텍스트를 다시 바이너리 이미지 바이트로 변환해야 합니다. 이 워크플로의 첫 버전에서는 Base64가 필요하지 않습니다.
Base64 출력의 경우 문자열을 바이트로 디코딩하세요:
import base64
from pathlib import Path

def save_base64_image(value, destination):
    # Also accepts a data URI such as data:image/png;base64,...
    encoded = value.split(",", 1)[1] if value.startswith("data:") else value
    Path(destination).write_bytes(base64.b64decode(encoded, validate=True))
흔한 GPT Image 2 Base64 디코딩 버그는 인코딩된 텍스트를 .png 파일에 직접 쓰는 것입니다. 유효한 이미지 파일에는 API가 반환한 JSON 문자열이 아니라 디코딩된 바이너리 바이트가 들어 있습니다.
GPT Proto 대신 OpenAI를 직접 사용한다면, GPT 이미지 모델은 b64_json을 반환한다는 점에 유의하세요. OpenAI의 이미지 생성 가이드에 따르면 GPT 이미지 모델에서는 URL 응답 형식이 지원되지 않습니다. 공급자별 차이 때문에 응답 파싱은 실제로 호출하는 엔드포인트와 일치해야 합니다.
6단계: 중복 이미지를 만들지 않고 재시도하세요
API 요청은 계정이 작업을 너무 빠르게 보내거나, 네트워크가 끊기거나, 생성 자체가 거부되어 실패할 수 있습니다. 실패한 모든 명령을 반복하고 싶을 수 있지만, 그러면 중복 이미지가 생성될 수 있습니다.
재시도가 모든 요청에 똑같이 안전한 것은 아닙니다. POST는 새 작업을 생성하고, GET는 기존 작업만 확인합니다.
GET 상태 쿼리는 다른 이미지를 생성하지 않으므로 재시도해도 안전합니다.
POST가 확실한 429 거부를 받으면 Retry-After를 기다린 후 다시 시도할 수 있습니다.
POST 연결 시간 초과는 모호합니다. 클라이언트가 응답을 놓쳤더라도 서버가 작업을 수락했을 수 있습니다. 무작정 반복하면 중복이 생성되고 비용이 청구될 수 있습니다.
완료되었거나 실패했거나 검열 차단된 작업은 자동으로 다시 제출해서는 안 됩니다.
아래 스크립트는 제출 직후 작업 ID를 manifest.json에 기록합니다. 다음 실행에서는 동일한 SKU를 다시 게시하지 않고 기존 작업을 폴링합니다. 제출이 알 수 없는 네트워크 상태로 끝나고 작업 ID가 없으면 레코드가 manual_check로 표시됩니다. 다시 시도하기 전에 계정 기록을 확인하세요.
안전한 재시도를 위해 지터를 포함한 지수 백오프를 사용하세요. API가 Retry-After를 보내면 이를 준수하고, 지연 시간과 시도 횟수에 상한을 두세요. 반복된 실패는 무한 루프가 아니라 매니페스트에 기록되어야 합니다.
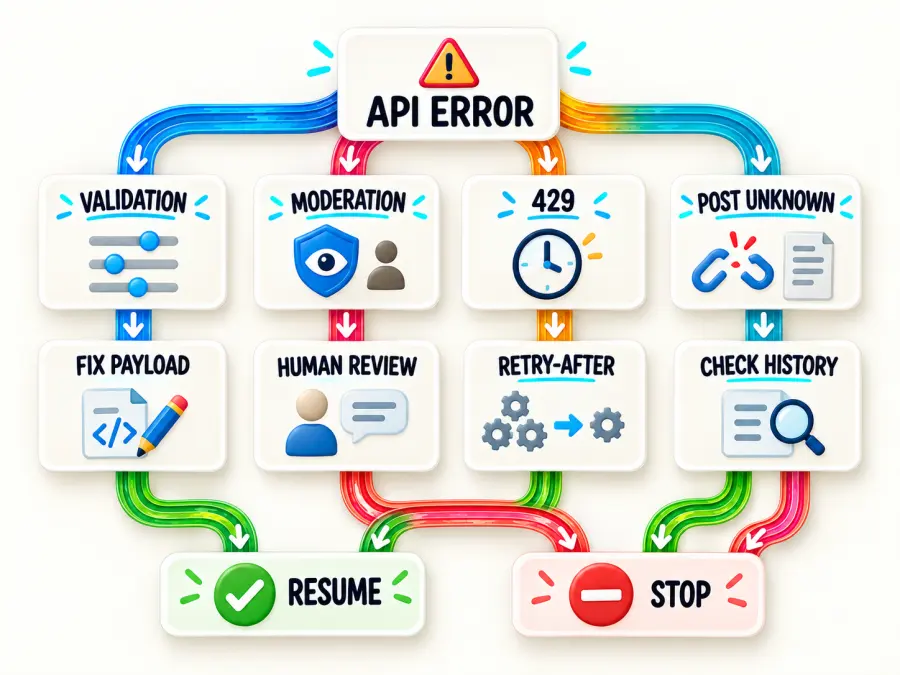
7단계: image_generation_user_error 처리
image_generation_user_error는 완전한 진단이 아니라 범주입니다. 입력이나 요청과 관련된 문제 때문에 요청을 생성할 수 없었다는 뜻입니다. 무엇을 변경할지 결정하기 전에 내부 오류 코드와 메시지를 읽으세요.
일반적인 조치는 다음과 같습니다:
| 오류 신호 |
가능한 조치 |
moderation_blocked 또는 정책 세부 정보 |
프롬프트와 참조 이미지가 있다면 검토하세요. 변경하지 않고 재시도하지 마세요 |
| 잘못된 크기 |
로컬 검증을 실행하고 치수를 수정하세요 |
| 잘못된 매개변수 또는 지원되지 않는 형식 |
페이로드를 현재 엔드포인트 참조와 비교하세요 |
인증 실패(401) |
키 값과 권한 부여 헤더를 확인하세요 |
권한 또는 잔액 실패(403) |
모델 액세스와 잔액을 확인하세요. 자동 백오프를 사용하지 마세요 |
속도 제한(429) |
Retry-After를 준수하고, 동시성을 낮추고, 상한을 두고 재시도하세요 |
서버 오류(500) |
요청을 기록하고 중복 위험을 이해한 경우에만 재시도하세요 |
요청이 통과될 때까지 단어를 삭제하여 검열 오류를 “고치려” 하지 마세요. 제품, 의도된 사용, 참조 자산 및 프롬프트가 공급자의 정책을 준수하는지 확인하세요.
초보자라면 작업이 실패할 때 이 순서를 사용하세요:
SKU를 manifest.json에서 찾으세요.
제품을 즉시 다시 제출하지 말고 해당 error 필드를 읽으세요.
메시지에 크기나 매개변수가 명시되어 있으면 해당 값을 수정하세요.
만약 이것이 429이면, IMAGE_WORKERS를 낮추고 계속하기 전에 기다리세요.
정책 또는 검열 오류라면 제품과 프롬프트를 수동으로 검토하세요.
상태가 manual_check이면 레코드를 삭제하기 전에 작업 기록을 확인하세요. 원래 요청이 이미 존재할 수 있습니다.
8단계: 팀 친화적인 생성 매니페스트 유지하기
매니페스트는 구성해야 하는 API 기능이 아닙니다. 스크립트가 컴퓨터에 생성하는 JSON 파일입니다. 생성 로그라고 생각하세요.
팀이나 비즈니스의 경우 이미지 폴더만으로는 충분하지 않습니다. 매니페스트는 각 에셋을 SKU, 프롬프트, 설정, 작업 ID, 상태, 출력 경로 및 오류와 연결합니다.
예시 레코드:
{
  "MUG-001": {
    "sku": "MUG-001",
    "status": "completed",
    "task_id": "prediction-id",
    "quality": "low",
    "size": "1024x1024",
    "prompt": "카탈로그 제품 사진 한 장을 생성하세요...",
    "files": ["generated/MUG-001-01.png"],
    "error": null
  }
}
이 레코드에서 completed는 이미지가 생성되고 다운로드되었음을 의미합니다. task_id는 API 접수 번호입니다. files는 팀에게 이미지가 저장된 위치를 알려줍니다. 생성이 실패하면 error에 SKU를 수정해야 하는지, 재시도해야 하는지, 검토해야 하는지 결정하는 데 필요한 정보가 포함됩니다.
이렇게 하면 검토자에게 안정적인 인수인계를 제공합니다. 또한 거부된 항목만 다시 생성하고, 프롬프트 버전을 비교하고, 에셋을 생성한 요청까지 추적할 수 있습니다. 더 큰 팀의 경우 동일한 필드를 데이터베이스에 저장하고 검토자, 승인 상태, 프롬프트 버전, 캠페인 및 권리 메모를 추가하세요.
대량 제품 생성을 위한 완전한 Python 스크립트
다음 스크립트는 워크플로를 결합합니다. 현재 GPT Proto v3 텍스트-투-이미지 엔드포인트와 예측 결과 경로를 사용하며, SKU당 n=1을 전송하고, 기본적으로 3개의 워커를 사용하며, manifest.json에서 알려진 작업을 재개합니다.
이 코드는 기본 API 데모보다 길지만, 여러분을 위해 여러 가지 안전 작업을 수행합니다:
요청을 보내기 전에 이미지 크기를 확인합니다.
API가 제품을 수락하자마자 작업 ID를 저장합니다.
수동으로 GET 명령을 실행하지 않아도 각 이미지를 기다립니다.
URL 결과를 다운로드하고 Base64 결과를 디코딩합니다.
한 번에 처리되는 제품 수를 제한합니다.
실패를 기록하고 재시작 후 알려진 작업을 계속합니다.
첫 실행 시에는 함수를 변경하지 않고 스크립트를 복사하세요. products.csv와 API 키만 제공하면 됩니다. 상단 근처의 설정—SIZE, QUALITY, WORKERS, 그리고 POLL_TIMEOUT—은 나중에 조정할 수 있습니다.
import base64
import csv
import json
import os
import random
import re
import threading
import time
from concurrent.futures import ThreadPoolExecutor, as_completed
from pathlib import Path
from urllib.parse import urlparse

import requests

API_ROOT = "https://gptproto.com/api/v3"
SUBMIT_URL = f"{API_ROOT}/openai/gpt-image-2/text-to-image"
RESULT_URL = f"{API_ROOT}/predictions/{{task_id}}/result"

CSV_PATH = Path(os.getenv("PRODUCTS_CSV", "products.csv"))
OUTPUT_DIR = Path(os.getenv("IMAGE_OUTPUT_DIR", "generated"))
MANIFEST_PATH = Path(os.getenv("IMAGE_MANIFEST", "manifest.json"))

SIZE = os.getenv("IMAGE_SIZE", "1024x1024")
QUALITY = os.getenv("IMAGE_QUALITY", "low")
WORKERS = int(os.getenv("IMAGE_WORKERS", "3"))
POLL_TIMEOUT = int(os.getenv("IMAGE_POLL_TIMEOUT", "900"))

API_KEY = os.environ["GPTPROTO_API_KEY"]
HEADERS = {
    "Authorization": f"Bearer {API_KEY}",
    "Content-Type": "application/json",
}

manifest_lock = threading.Lock()


class SubmissionStateUnknown(RuntimeError):
    """The POST may have reached the server, but no task ID was received."""


def validate_size(size):
    if size == "auto":
        return
    if not re.fullmatch(r"\d+x\d+", size.lower()):
        raise ValueError("Size must look like 1024x1024 or be 'auto'")

    width, height = map(int, size.lower().split("x"))
    pixels = width * height
    if width % 16 or height % 16:
        raise ValueError("GPT Image 2 width and height must be multiples of 16")
    if max(width, height) > 3840:
        raise ValueError("The longest edge cannot exceed 3840 pixels")
    if max(width, height) / min(width, height) > 3:
        raise ValueError("Aspect ratio cannot exceed 3:1")
    if not 655_360 <= pixels <= 8_294_400:
        raise ValueError("Total pixels are outside the supported range")


def build_prompt(row):
    return f"""Create one catalog product photograph.
Product: {row['name']}
Color: {row['color']}
Material: {row['material']}
View: {row['angle']}
Background: {row['background']}

Keep the product centered with realistic proportions and material texture.
Use soft studio lighting, a natural contact shadow, and generous crop-safe space.
No text, logos, labels, people, or extra objects.
Also avoid: {row.get('avoid', 'none')}.
Return a single product image, not a collage or contact sheet."""


def load_manifest():
    if not MANIFEST_PATH.exists():
        return {}
    return json.loads(MANIFEST_PATH.read_text(encoding="utf-8"))


manifest = load_manifest()


def save_record(sku, **changes):
    with manifest_lock:
        record = manifest.setdefault(sku, {"sku": sku})
        record.update(changes)
        temporary = MANIFEST_PATH.with_suffix(".json.tmp")
        temporary.write_text(
            json.dumps(manifest, indent=2, ensure_ascii=False),
            encoding="utf-8",
        )
        temporary.replace(MANIFEST_PATH)


def parse_json(response):
    try:
        return response.json()
    except ValueError:
        return {"raw_response": response.text[:1000]}


def api_error(response):
    payload = parse_json(response)
    return RuntimeError(
        f"HTTP {response.status_code}: {json.dumps(payload, ensure_ascii=False)}"
    )


def submit(prompt):
    payload = {
        "prompt": prompt,
        "n": 1,
        "quality": QUALITY,
        "size": SIZE,
        "enable_sync_mode": False,
        "response_format": "url",
    }

    # Retry only a definite 429 rejection. A connection failure is ambiguous:
    # the job may exist even though this client did not receive its ID.
    for attempt in range(5):
        try:
            response = requests.post(
                SUBMIT_URL,
                headers=HEADERS,
                json=payload,
                timeout=(10, 180),
            )
        except requests.RequestException as exc:
            raise SubmissionStateUnknown(str(exc)) from exc

        if response.status_code != 429:
            if response.status_code >= 400:
                raise api_error(response)
            body = parse_json(response)
            data = body.get("data", body)
            task_id = data.get("id")
            if not task_id:
                raise RuntimeError(f"Submission returned no data.id: {body}")
            return task_id

        if attempt == 4:
            raise api_error(response)
        retry_after = response.headers.get("Retry-After")
        delay = float(retry_after) if retry_after and retry_after.isdigit() else 2**attempt
        time.sleep(min(30, delay) + random.random())

    raise RuntimeError("Submission retry loop ended unexpectedly")


def get_result(task_id):
    deadline = time.monotonic() + POLL_TIMEOUT
    delay = 2.0

    while time.monotonic() < deadline:
        try:
            response = requests.get(
                RESULT_URL.format(task_id=task_id),
                headers=HEADERS,
                timeout=(10, 60),
            )
        except requests.RequestException:
            time.sleep(delay + random.random())
            delay = min(10, delay * 1.5)
            continue

        if response.status_code == 429 or response.status_code >= 500:
            retry_after = response.headers.get("Retry-After")
            wait = float(retry_after) if retry_after and retry_after.isdigit() else delay
            time.sleep(min(30, wait) + random.random())
            delay = min(10, delay * 1.5)
            continue
        if response.status_code >= 400:
            raise api_error(response)

        body = parse_json(response)
        data = body.get("data", body)
        status = str(data.get("status", "")).lower()

        if status in {"completed", "succeeded"}:
            outputs = data.get("outputs") or []
            if not outputs:
                raise RuntimeError(f"Completed task returned no outputs: {body}")
            return outputs
        if status in {"failed", "canceled", "cancelled"}:
            raise RuntimeError(json.dumps(data.get("error") or body, ensure_ascii=False))

        time.sleep(delay)
        delay = min(10, delay * 1.25)

    raise TimeoutError(f"Task {task_id} exceeded {POLL_TIMEOUT} seconds")


def filename_part(value):
    cleaned = re.sub(r"[^A-Za-z0-9._-]+", "-", value.strip())
    return cleaned.strip("-._") or "product"


def extension_from_response(response, url):
    content_type = response.headers.get("Content-Type", "").split(";", 1)[0]
    by_type = {"image/png": ".png", "image/jpeg": ".jpg", "image/webp": ".webp"}
    if content_type in by_type:
        return by_type[content_type]
    suffix = Path(urlparse(url).path).suffix.lower()
    return suffix if suffix in {".png", ".jpg", ".jpeg", ".webp"} else ".png"


def save_output(output, sku, index):
    OUTPUT_DIR.mkdir(parents=True, exist_ok=True)
    stem = f"{filename_part(sku)}-{index:02d}"

    if isinstance(output, dict):
        output = output.get("url") or output.get("b64_json") or output.get("data")
    if not isinstance(output, str):
        raise TypeError(f"Unsupported output value: {output!r}")

    if output.startswith(("http://", "https://")):
        response = requests.get(output, timeout=(10, 180))
        response.raise_for_status()
        destination = OUTPUT_DIR / f"{stem}{extension_from_response(response, output)}"
        destination.write_bytes(response.content)
        return str(destination)

    encoded = output.split(",", 1)[1] if output.startswith("data:") else output
    destination = OUTPUT_DIR / f"{stem}.png"
    destination.write_bytes(base64.b64decode(encoded, validate=True))
    return str(destination)


def process_product(row):
    sku = row["sku"].strip()
    prompt = build_prompt(row)
    previous = manifest.get(sku, {})

    if previous.get("status") == "completed":
        return sku, "skipped: already completed"
    if previous.get("status") == "manual_check" and not previous.get("task_id"):
        return sku, "skipped: verify task history before resubmitting"
    if previous.get("status") == "failed":
        return sku, "skipped: review the recorded error before retrying"

    task_id = previous.get("task_id")

    try:
        if not task_id:
            task_id = submit(prompt)
            save_record(
                sku,
                status="submitted",
                task_id=task_id,
                quality=QUALITY,
                size=SIZE,
                prompt=prompt,
                files=[],
                error=None,
            )

        save_record(sku, status="processing")
        outputs = get_result(task_id)
        files = [save_output(value, sku, i) for i, value in enumerate(outputs, 1)]
        save_record(sku, status="completed", files=files, error=None)
        return sku, f"completed: {', '.join(files)}"

    except SubmissionStateUnknown as exc:
        save_record(
            sku,
            status="manual_check",
            task_id=None,
            quality=QUALITY,
            size=SIZE,
            prompt=prompt,
            files=[],
            error=f"Submission state unknown: {exc}",
        )
        return sku, "manual check required"
    except TimeoutError as exc:
        # Keep the task ID. The next run will poll this job instead of submitting
        # the SKU again, so a slow generation does not become a duplicate.
        save_record(sku, status="poll_timeout", task_id=task_id, error=str(exc))
        return sku, f"poll timed out; resume task {task_id} on the next run"
    except Exception as exc:
        save_record(sku, status="failed", task_id=task_id, error=str(exc))
        return sku, f"failed: {exc}"


def main():
    validate_size(SIZE)
    if WORKERS < 1:
        raise ValueError("IMAGE_WORKERS must be at least 1")

    with CSV_PATH.open(newline="", encoding="utf-8-sig") as handle:
        products = list(csv.DictReader(handle))

    required = {"sku", "name", "color", "material", "angle", "background"}
    missing = required - set(products[0]) if products else required
    if missing:
        raise ValueError(f"CSV is missing columns: {sorted(missing)}")

    skus = [row["sku"].strip() for row in products]
    if not all(skus):
        raise ValueError("Every CSV row must have a non-empty SKU")
    if len(skus) != len(set(skus)):
        raise ValueError("CSV contains duplicate SKUs; make each SKU unique before running")

    with ThreadPoolExecutor(max_workers=WORKERS) as pool:
        futures = [pool.submit(process_product, row) for row in products]
        for future in as_completed(futures):
            sku, message = future.result()
            print(f"[{sku}] {message}")


if __name__ == "__main__":
    main()
스크립트 실행 방법: 초보자 안내
1. 두 입력 파일 확인
gpt-image-bulk 폴더를 열고 다음 항목이 포함되어 있는지 확인하세요:
bulk_product_images.py, 전체 Python 코드가 포함되어 있습니다.
products.csv, 헤더와 최소 하나의 제품 행이 포함되어 있습니다.
스크립트를 bulk_product_images.py.txt로 저장하지 마세요. 편집기에서 파일 확장자를 숨기는 경우, 계속하기 전에 파일 형식을 확인하세요.
2. 해당 폴더에서 터미널 열기
터미널이 두 파일과 같은 폴더를 보고 있어야 합니다. cd 뒤에 폴더 경로를 사용할 수 있습니다. 예:
cd path/to/gpt-image-bulk
현재 폴더는 macOS/Linux에서는 pwd, PowerShell에서는 Get-Location으로 확인할 수 있습니다.
3. API 키 설정 및 requests 설치
설정 섹션에 표시된 명령을 사용해 GPTPROTO_API_KEY를 설정하세요. 그런 다음 아직 설치하지 않았다면 requests를 설치하세요:
python -m pip install requests
4. 파일 실행
macOS, Linux 및 대부분의 Python 설치 환경:
python bulk_product_images.py
Windows에서는 Python 명령이 py인 경우 다음을 사용하세요:
py bulk_product_images.py
첫 번째 제품은 완료되는 데 시간이 걸릴 수 있습니다. API가 생성하는 동안 터미널이 반드시 멈춘 것은 아닙니다. 작업이 완료되면 다음과 비슷한 줄이 표시됩니다:
[MUG-001] completed: generated/MUG-001-01.png
[BAG-014] completed: generated/BAG-014-01.png
[LAMP-207] completed: generated/LAMP-207-01.png
이제 폴더에 generated/ 및 manifest.json이 포함됩니다. 생성된 이미지를 열고 각 이미지를 일치하는 CSV 행과 비교하세요. 그런 다음 텍스트 편집기에서 manifest.json을 열어 모든 성공한 SKU에 "status": "completed"이 있는지 확인하세요.
5. 다시 실행할 때 어떤 일이 발생하는지 이해하기
스크립트는 새 요청을 보내기 전에 manifest.json을 읽습니다. 완료된 SKU는 건너뜁니다. 이전에 폴링 중 중단된 작업은 작업 ID를 유지하고 다시 확인합니다. manual_check 또는 failed로 표시된 레코드는 자동으로 제출되지 않습니다.
이것은 의도된 동작입니다. “명령을 다시 실행”하는 것이 “성공한 모든 이미지에 다시 비용을 지불”하는 일이 되지 않도록 합니다. 실패한 레코드를 안전하게 재시도할 수 있다면 해당 오류를 검토한 후 manifest.json에서 해당 SKU의 레코드만 제거하세요. 전체 카탈로그를 의도적으로 다시 제출하려는 것이 아니라면 전체 매니페스트를 삭제하지 마세요.
6. 초안에서 최종 이미지로 이동
첫 번째 시도에서는 IMAGE_QUALITY=low 및 IMAGE_WORKERS=2 또는 3을 유지하세요. 초안을 검토하고 승인된 제품 행만 products-final.csv라는 새 파일에 복사하세요.
macOS 또는 Linux에서 별도의 최종 실행을 하려면 초안 파일이 그대로 유지되도록 새 출력 및 매니페스트 이름을 사용하세요:
PRODUCTS_CSV=products-final.csv \
IMAGE_OUTPUT_DIR=generated-final \
IMAGE_MANIFEST=manifest-final.json \
IMAGE_QUALITY=high \
python bulk_product_images.py
Windows PowerShell에서는 동일한 값을 먼저 설정한 다음 스크립트를 실행하세요:
$env:PRODUCTS_CSV="products-final.csv"
$env:IMAGE_OUTPUT_DIR="generated-final"
$env:IMAGE_MANIFEST="manifest-final.json"
$env:IMAGE_QUALITY="high"
py bulk_product_images.py
이렇게 하면 비교를 위해 초안 이미지와 초안 매니페스트를 보존하면서 generated-final/에 최종 이미지가 생성됩니다.
대량 작업을 위한 GPT Image 2 가격
GPT Image 2 가격은 토큰 기반이므로 모든 작업에 적용되는 단일 “제품 이미지당 비용”은 정직하게 말해 없습니다. 텍스트 입력, 참조 이미지 입력, 출력 크기, 품질, 결과 수가 모두 총액에 영향을 줍니다.
초보자에게 “백만 토큰당”은 청구 단위이며, 월 구독이나 백만 토큰을 미리 구매해야 한다는 요구 사항이 아닙니다. 프롬프트는 텍스트 입력 토큰이 됩니다. 편집에 사용된 참조 제품 사진은 이미지 입력 토큰이 됩니다. 생성된 그림은 이미지 출력 토큰이 됩니다. 텍스트-이미지 요청은 소스 이미지가 업로드되지 않았으므로 참조 이미지 입력 비용이 없습니다.
작성 시점에 GPT Proto 모델 페이지에는 백만 토큰당 다음 요율이 나와 있습니다:
| 토큰 범주 |
GPT Proto 책정 요율 |
OpenAI 표준 요율 |
| 텍스트 입력 |
$4.00 |
$5.00 |
| 이미지 입력 |
$6.40 |
$8.00 |
| 캐시된 이미지 입력 |
$1.60 |
$2.00 |
| 이미지 출력 |
$24.00 |
$30.00 |
이는 나열된 OpenAI 표준 토큰 요율보다 20% 낮습니다. 가격은 변경될 수 있으므로 견적을 게시하거나 대규모 실행을 시작하기 전에 실시간 GPT Image 2 모델 페이지를 확인하세요.
OpenAI의 가격 참고 자료에는 일반적인 크기에 대한 유용한 출력 전용 예시도 나와 있습니다. 1024x1024 이미지는 저품질 약 $0.006, 중품질 $0.053, 고품질 $0.211로 나와 있습니다. 1536x1024 또는 1024x1536 이미지는 각각 약 $0.005, $0.041, $0.165입니다. 입력 토큰은 추가입니다. 이 수치를 영구적인 것으로 간주하지 말고 현재 OpenAI API 가격 페이지를 확인하세요.
카탈로그 견적을 내려면 실제 제품 구성을 반영하는 20개 항목 파일럿을 실행하세요. 실제 지출, 승인된 이미지 비율, 재생성 비율을 기록하세요. 그런 다음 계산하세요:
예상 카탈로그 비용 =
  시도당 평균 API 비용
  × 승인된 이미지당 평균 시도 횟수
  × 제품 수
재생성 비율은 간과하기 쉽습니다. 네 번의 시도가 필요한 저렴한 초안은 첫 번째나 두 번째 시도에서 승인된 더 잘 제어된 중간 품질 작업보다 비용이 더 많이 들 수 있습니다.
텍스트-이미지 대신 참조 이미지를 사용해야 할 때
순수 텍스트-이미지는 제품이 일반적이거나, 이미지가 개념적이거나, 정확한 포장이 판매 가능한 품목과 일치할 필요가 없을 때 적합합니다. 정확한 SKU 표현을 위한 기본값이 되어서는 안 됩니다.
기존 제품의 형태, 색상, 포장 또는 디자인 언어를 보존해야 할 때 GPT Image 2 이미지 편집 엔드포인트를 사용하세요. GPT Image 2는 공식 형식 문서에서 각 50MB 미만의 PNG, WebP 또는 JPEG 참조 이미지를 최대 16개까지 허용하며, 높은 입력 충실도를 자동으로 사용합니다. GPT Proto의 제공자 형식 엔드포인트는 이미지 URL 또는 Base64 데이터 URI를 허용합니다. 자세한 내용은 GPT Image 2 이미지 편집 참조를 참조하세요.
좋은 참조 세트에는 다음이 포함됩니다:
참조 이미지는 제어를 향상시키지만 픽셀 단위로 완벽한 라벨, 작은 텍스트 또는 제품 치수를 보장하지는 않습니다. 사람 검토자가 게시 전에 생성된 자산을 소스 제품과 비교해야 합니다.
비즈니스 및 팀 사용을 위한 프로덕션 체크리스트
파일럿에서 대량 생성으로 전환하기 전:
프롬프트 버전을 고정하고 매니페스트에 저장하세요.
변경 불가능한 SKU 하나를 기본 에셋 키로 사용하세요.
초안은 낮은 품질로 생성하고, 승인된 구성만 최종 설정으로 렌더링하세요.
워커 수를 구성 가능하게 유지하고, 429 응답이 반복되면 줄이세요.
폴링하기 전에 작업 ID를 저장하세요.
모든 임시 결과 URL을 즉시 다운로드하세요.
다음 상태를 구분하세요: failed, manual_check, completed.
모더레이션, 권한 또는 잔액 오류는 변경 없이 재시도하지 마세요.
샘플 결과에서 기하 구조, 색상, 라벨, 그림자, 자르기, 중복 객체를 확인하세요.
소스/참조 권리를 보존하고 검토 승인을 기록하세요.
API 키는 CSV나 리포지토리가 아니라 비밀 관리자 또는 환경 변수에 보관하세요.
카탈로그를 자동화하기 전 프롬프트 개발을 위해서는 GPT Image 2 프롬프트 예시가 시각적 방향을 정립하는 데 도움이 될 수 있습니다. 선택한 방향을 대규모로 실행하기 전에 구조화된 필드로 변환하세요.
작은 카탈로그 슬라이스로 시작하기
API 호출은 쉬운 부분입니다. 안정적인 대량 생성은 하나의 제품과 하나의 변형을 분리하고, 동시성을 제한하고, 입력을 검증하고, 예측 ID를 저장하고, 모든 실행을 재개 가능하게 만드는 데서 비롯됩니다.
대표적인 SKU 10~20개를 낮은 품질로 시작하세요. 승인 및 재생성 비율을 측정하고, 공유 프롬프트를 수정한 다음에야 대기열을 확장하세요. 현재 매개변수와 가격은 GPT Image 2 모델 페이지에서 확인하거나, 스크립트를 실행할 준비가 되면 GPT Proto 홈페이지에서 계정을 만들 수 있습니다.