The Short Answer: How Should You Prompt GPT Image 2.5?
A reliable GPT Image 2.5 prompt names the asset first, then describes what should be visible. If you are editing an image, separate the requested change from everything that must remain unchanged.
Use this as a checklist, not a rigid syntax:
Deliverable


+ Subject


+ Scene


+ Composition


+ Visible visual direction


+ Exact text, if required


+ Reference-image roles, if required


+ Requested change, for an edit


+ Preservation rules


+ Exclusions
A simple generation may need only the first five items. A poster needs explicit text rules. An image edit needs a clear change-and-preserve boundary. Multiple reference images need separate roles.
There is no secret formatting trick. OpenAI's image prompting guide says that short prompts, prose, tagged sections, and JSON-like structures can all express the same intent. Use the format that makes the brief easiest to read, test, and revise.
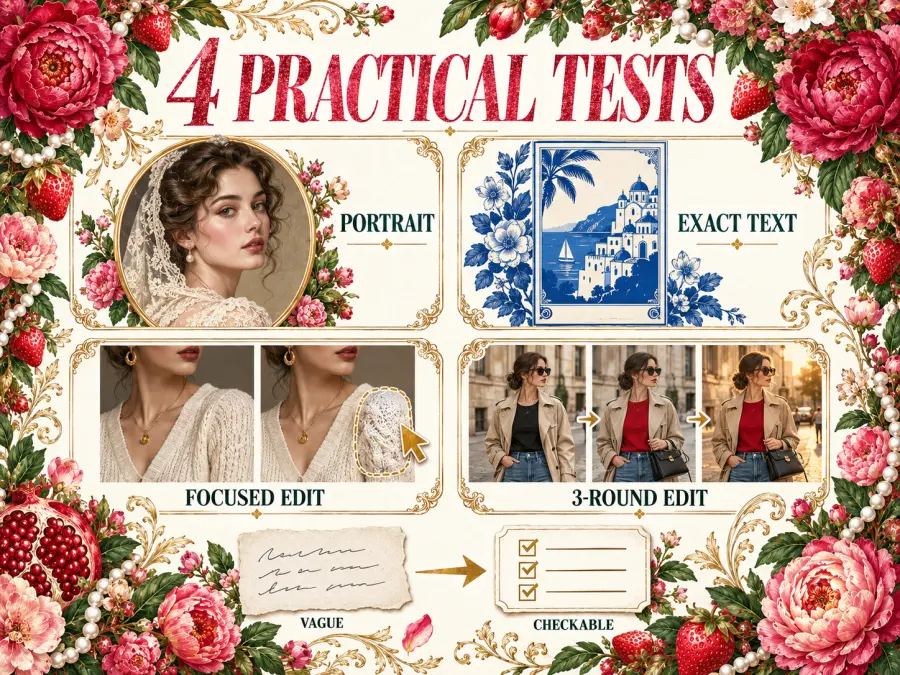
Test 1: How to Prompt GPT Image 2.5 for a Realistic Photo
The first test uses an original editorial portrait concept inspired by classic studio photography: chestnut curls, burgundy velvet, ivory lace, warm directional light, and visible film texture. The references guide the visual direction only; the prompt does not ask the model to reproduce a real person's identity.
Both attempts were run in the same ChatGPT image workflow. ChatGPT does not expose a fixed seed or the underlying API variant, so this pair should be treated as a practical demonstration rather than a deterministic benchmark. The visible difference is still useful: one prompt delegates almost every choice, while the other defines choices that can be inspected.
Attempt A: A Vague Realistic-Photo Prompt
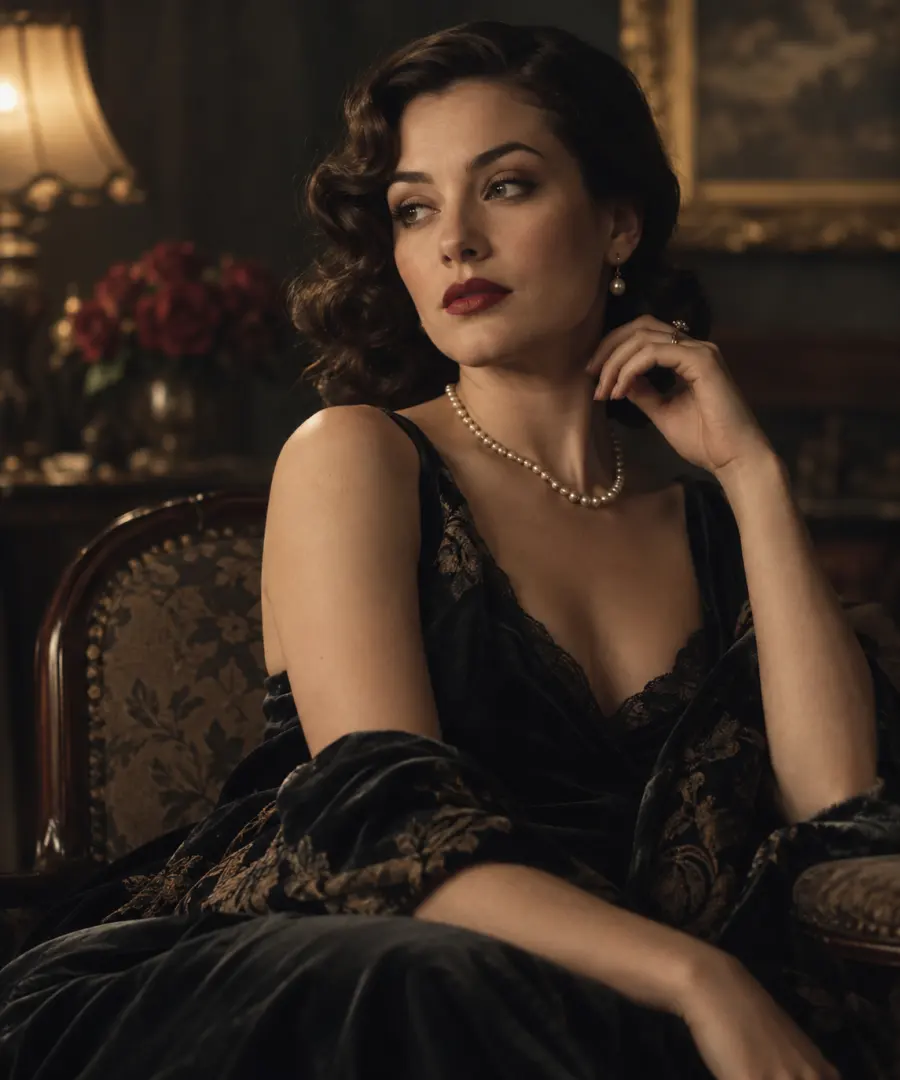
Create a beautiful cinematic portrait of a woman in a vintage style.
This prompt identifies a broad category but leaves nearly every visible decision to the model. “Beautiful,” “cinematic,” and “vintage” do not define the crop, light source, material, skin treatment, or background. The output may look polished while still feeling generic.
Attempt B: A Prompt with Visible Requirements
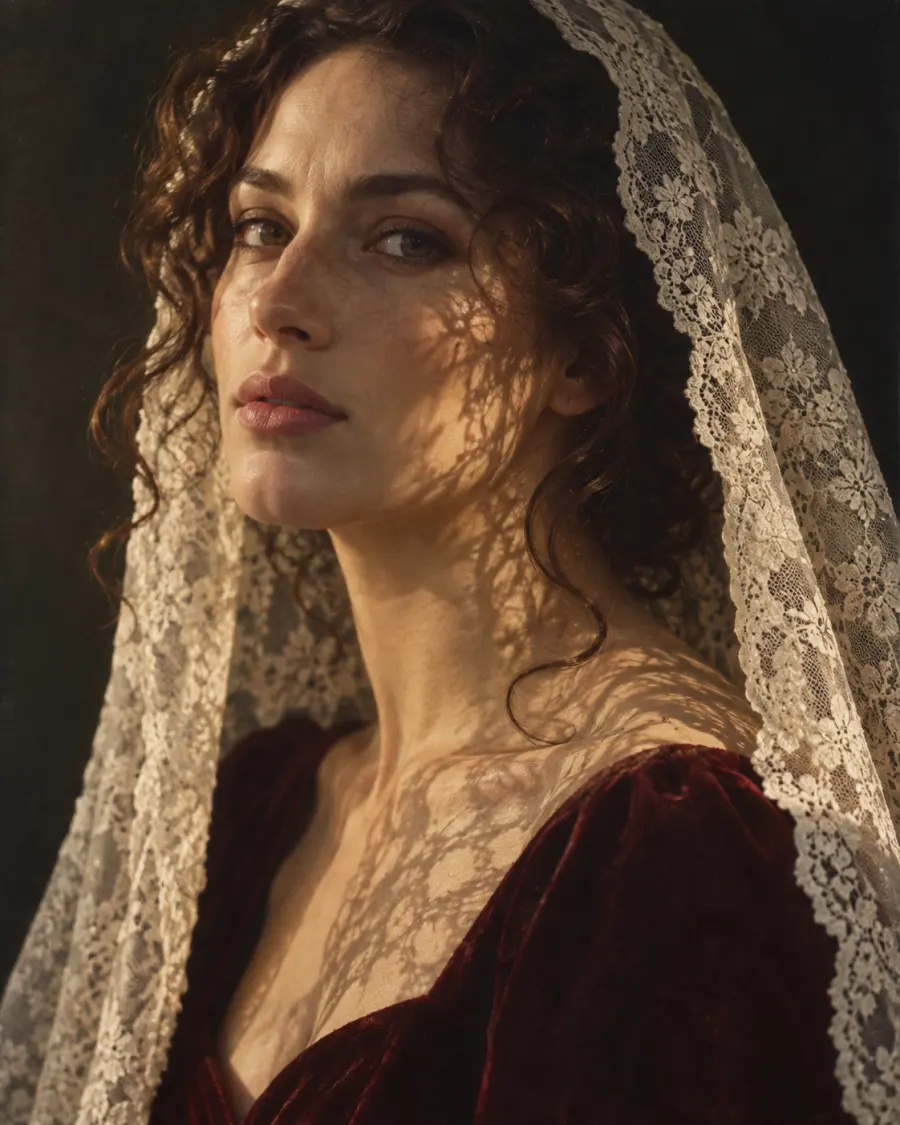
Create a vertical editorial portrait photograph of an adult woman with shoulder-length chestnut curls.

Frame her from the upper chest upward, turned slightly away from the camera while looking just past the lens. She wears a deep burgundy velvet dress beneath an ivory lace veil.

Warm late-afternoon sunlight passes through the lace and casts an intricate but natural shadow pattern across one side of her face, neck, and dress. Preserve visible skin texture, individual hair strands, the soft pile of the velvet, and the fine woven structure of the lace.

The photograph should resemble a carefully exposed 35mm film portrait: warm highlights, deep neutral shadows, restrained grain, and a dark, quiet studio background.

No plastic-looking skin, beauty-filter smoothing, glossy commercial retouching, extra jewelry, text, logo, or watermark.
The second prompt is longer because the brief contains more decisions, not because length itself improves an image. Every added phrase gives you something visible to inspect.
| Prompt change |
What to inspect in the output |
| Named an editorial portrait |
Does the result look intentionally composed rather than like a generic headshot? |
| Defined crop and gaze |
Is the upper-chest framing correct, and are the eyes directed as requested? |
| Located the light source |
Does the lace shadow follow a believable direction? |
| Named four textures |
Can you distinguish skin, hair, velvet, and lace? |
| Added exclusions |
Is there less smoothing, gloss, or unwanted decoration? |
What Happened
Attempt A produced an attractive vintage portrait, but the model made most of the creative decisions itself. It chose a seated three-quarter composition, a black lace dress, pearl jewelry, a furnished interior, and soft lamp light. None of those choices was wrong, but they could not be predicted from the prompt. The image reads as a general vintage-glamour portrait rather than the specific editorial concept used for this test.
Attempt B followed the requested brief much more closely. The result uses a tight portrait crop, chestnut curls, a burgundy velvet dress, an ivory lace veil, a dark background, and warm directional light. The lace produces a visible shadow pattern across the face, neck, and dress, while the velvet, lace, hair, and skin remain visually distinct. It also avoids the jewelry and furnished-room details introduced in Attempt A.
The second result is not better merely because its prompt is longer. It is better aligned because the prompt defines visible decisions. One limitation remains: the lace shadow is stronger and more dominant than a photographer might choose, so that instruction would be the next variable to soften.
“Photorealistic” tells the model the category. Framing, light, material, and texture instructions tell it what that realism should look like.
Test 2: How to Render Exact Text with GPT Image 2.5
Text generation becomes harder when a poster combines several lines, different type sizes, and a curved composition. For this test, the design is an original blue-and-ivory screen-printed poster with a large wave, arched lettering, paper grain, and three required text elements:
NORTHLINE
DESIGN AFTER DARK
SEPTEMBER 18 · 7 PM
Attempt A: Exact Copy without Placement Rules
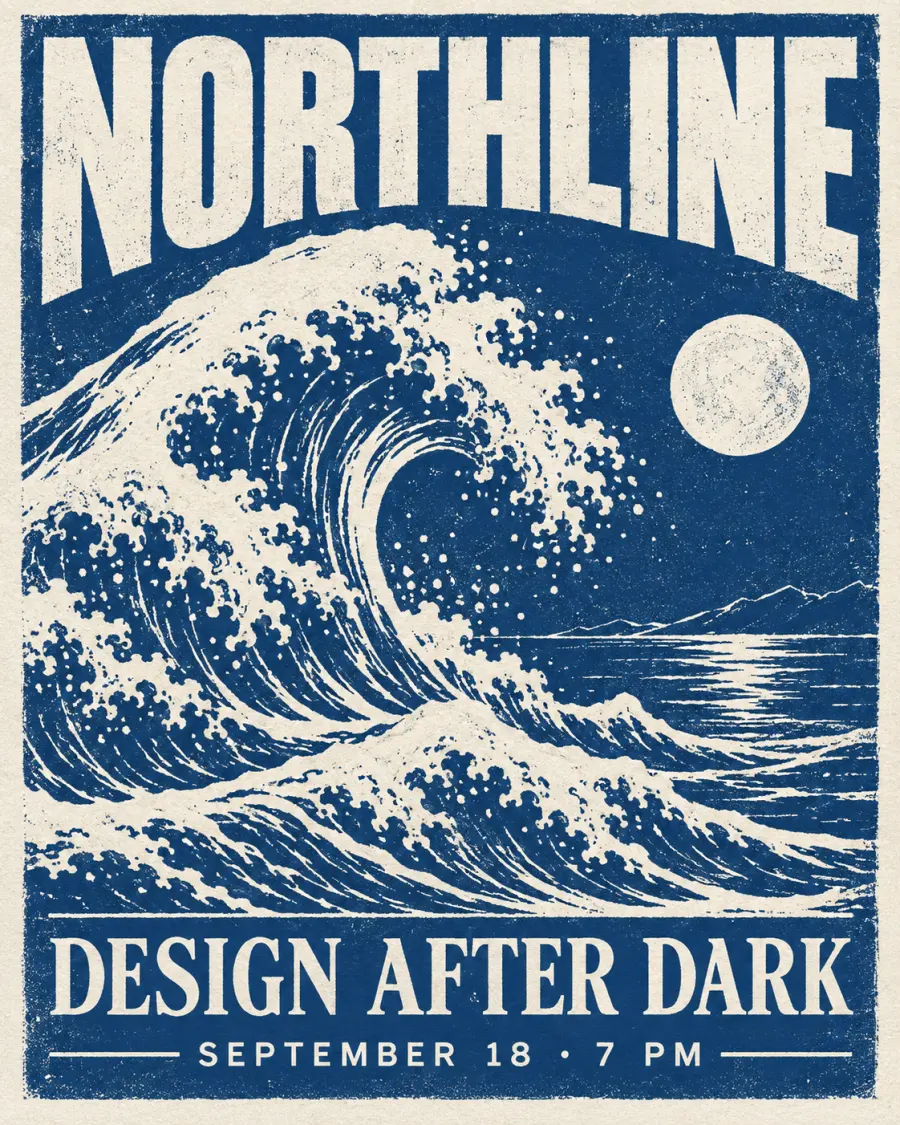
Create a vintage blue-and-white screen-printed poster with a large stylized wave.

Include the text:
NORTHLINE
DESIGN AFTER DARK
SEPTEMBER 18 · 7 PM
The wording is present in the request, but the model has not been told how often each line should appear, which line is most important, or where the copy belongs. Check for misspellings, missing words, repeated text, invented slogans, and weak hierarchy.
Attempt B: Quote, Count, and Position Every Line
Create one vertical vintage screen-printed event poster in a two-color palette of deep cobalt blue and warm ivory.

Composition:
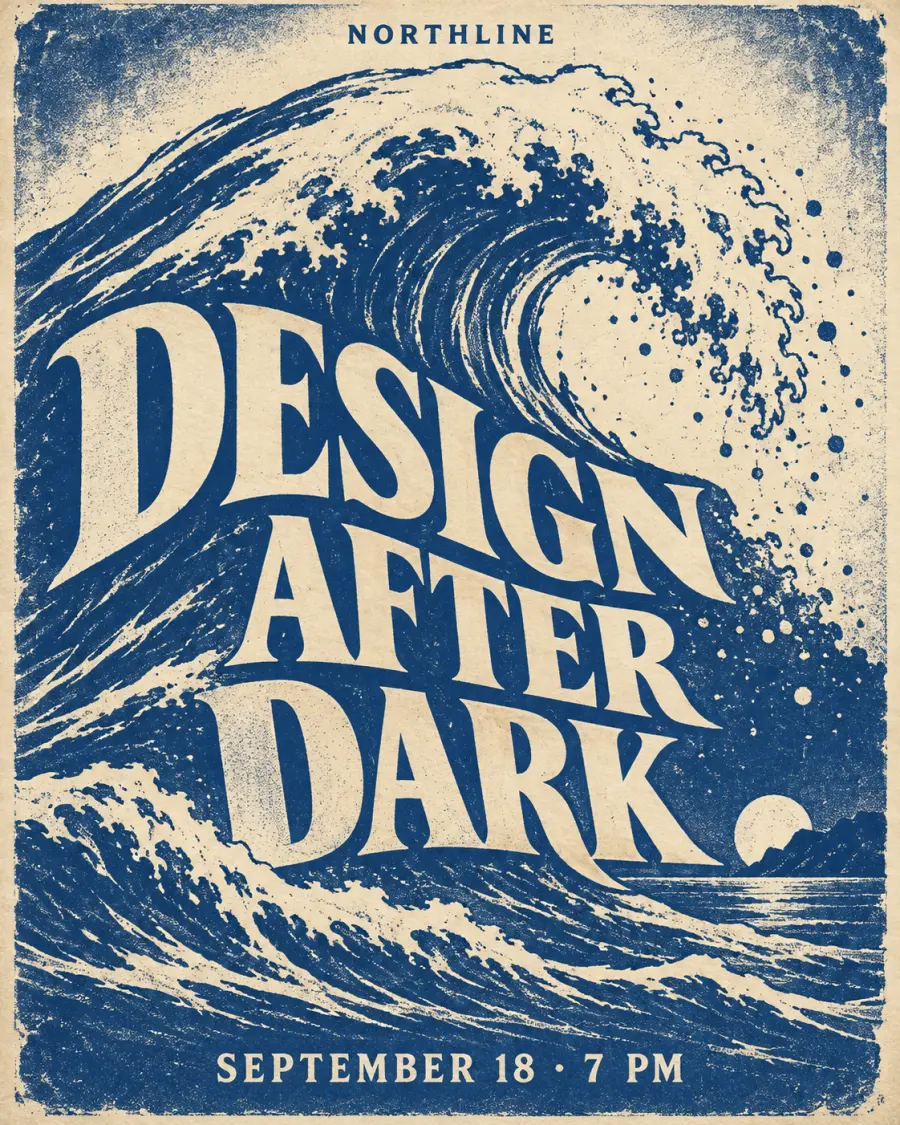
A bold stylized ocean wave rises diagonally through the center. The typography curves with the wave without becoming distorted or difficult to read. Use visible paper grain, slightly imperfect ink coverage, and restrained edge wear.

Render these three text elements exactly once each:


1. “NORTHLINE” — small uppercase brand name at the top.


2. “DESIGN AFTER DARK” — the largest headline, stacked across the center and integrated with the wave.


3. “SEPTEMBER 18 · 7 PM” — smaller event information along the bottom.

Spelling and punctuation must match the quoted copy exactly. Maintain a clear hierarchy between brand, headline, and date. Do not add, repeat, abbreviate, translate, or replace any words.

No other text, letters, logos, signatures, or watermarks.
Do not judge this test only from a zoomed-out preview. Record the result line by line.
| Required text |
Attempt A |
Attempt B |
NORTHLINE |
Pass: correct and shown once |
Pass: correct, shown once, and placed at the top |
DESIGN AFTER DARK |
Pass: correct and shown once |
Pass: correct, shown once, and used as the dominant central headline |
SEPTEMBER 18 · 7 PM |
Pass: correct and shown once |
Pass: correct, shown once, and placed along the bottom |
| Extra text |
None observed |
None observed |
OpenAI recommends quoting required copy, specifying its position and typography, and asking for no extra text. It also recommends comparing medium or high quality when the design includes small text, dense information, or several fonts. That can improve the odds, but it is not a spelling guarantee. Verify every final asset.
If one line is wrong, edit that line alone before regenerating the whole poster. A focused correction gives the model fewer opportunities to redesign parts that were already acceptable.
What Happened
Both attempts rendered all three lines correctly, exactly once, without extra copy. That matters because this test did not manufacture a text failure for the shorter prompt. Attempt A already produced a usable poster with strong contrast and readable type.
The structured prompt improved control rather than spelling. Attempt B placed NORTHLINE as a small brand line at the top, made DESIGN AFTER DARK the dominant central headline, integrated that headline into the wave, and kept the date at the bottom. The hierarchy is much closer to the written brief, although the curved headline is slightly less effortless to scan than the straighter type in Attempt A.
The practical lesson is not that every short text prompt fails. Quoting, counting, and positioning the copy makes the acceptance criteria explicit and reduces the number of layout decisions left to chance. Exact spelling still needs a visual check on every output.
Test 3: How to Edit a Photo without Changing Everything Else
A good edit prompt describes two things: the requested change and the boundary around it. Describing only the new outfit gives the model permission—implicitly—to reinterpret the rest of the photograph.
For this test, first create an original source image: two adult women wearing black street fashion on a broad European city street, surrounded by pale historic buildings and cool natural daylight. Use that generated image as the input for both edit attempts.
Attempt A: The Vague Edit
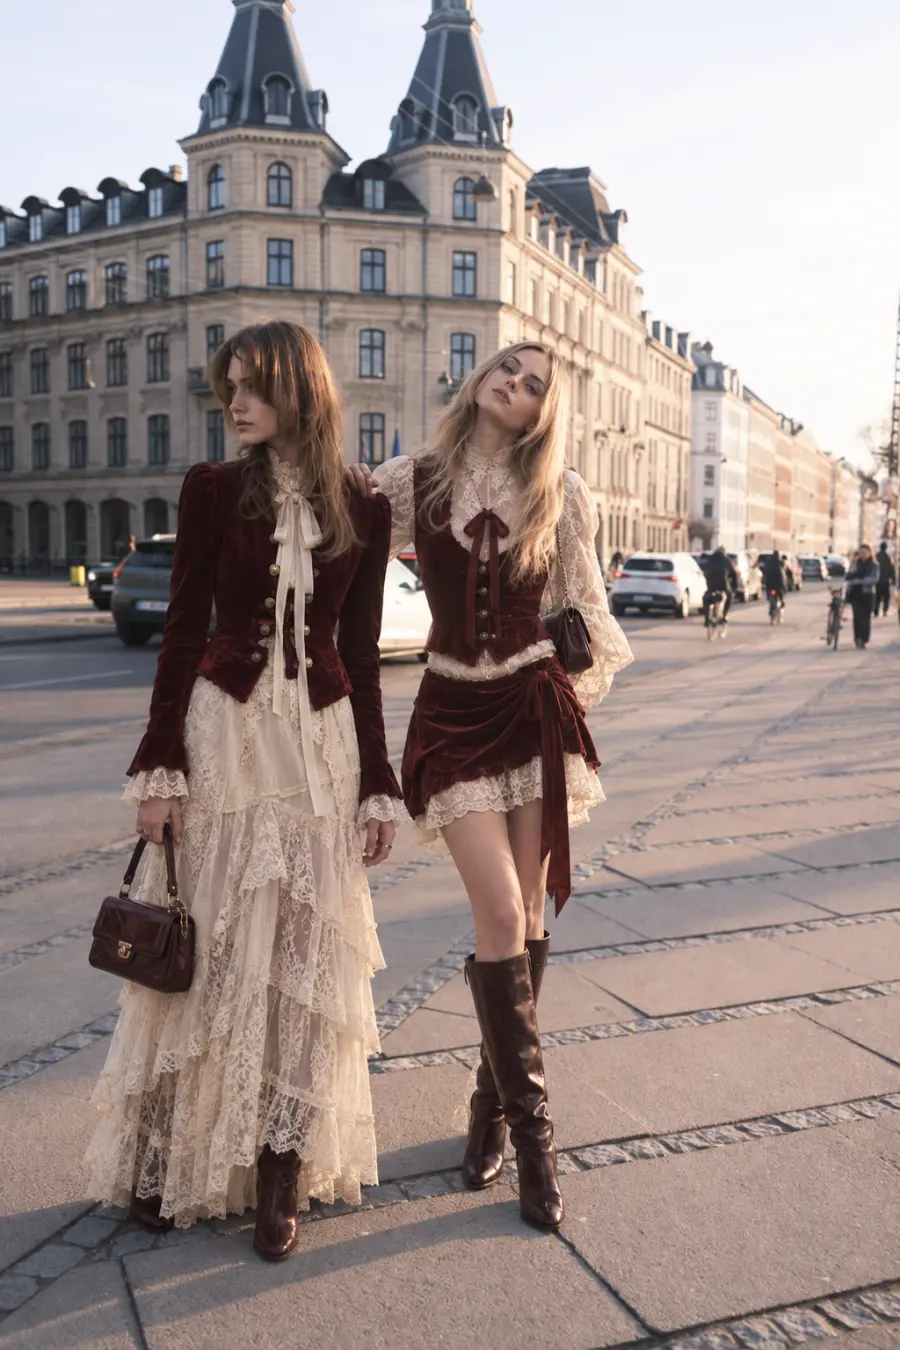
Change their outfits to burgundy and cream vintage fashion.
The instruction is clear about the broad wardrobe direction but silent about identity, pose, hair, lighting, background, and camera position. Any of those details may move.
Attempt B: Separate Change, Preserve, and Exclude
Requested change:
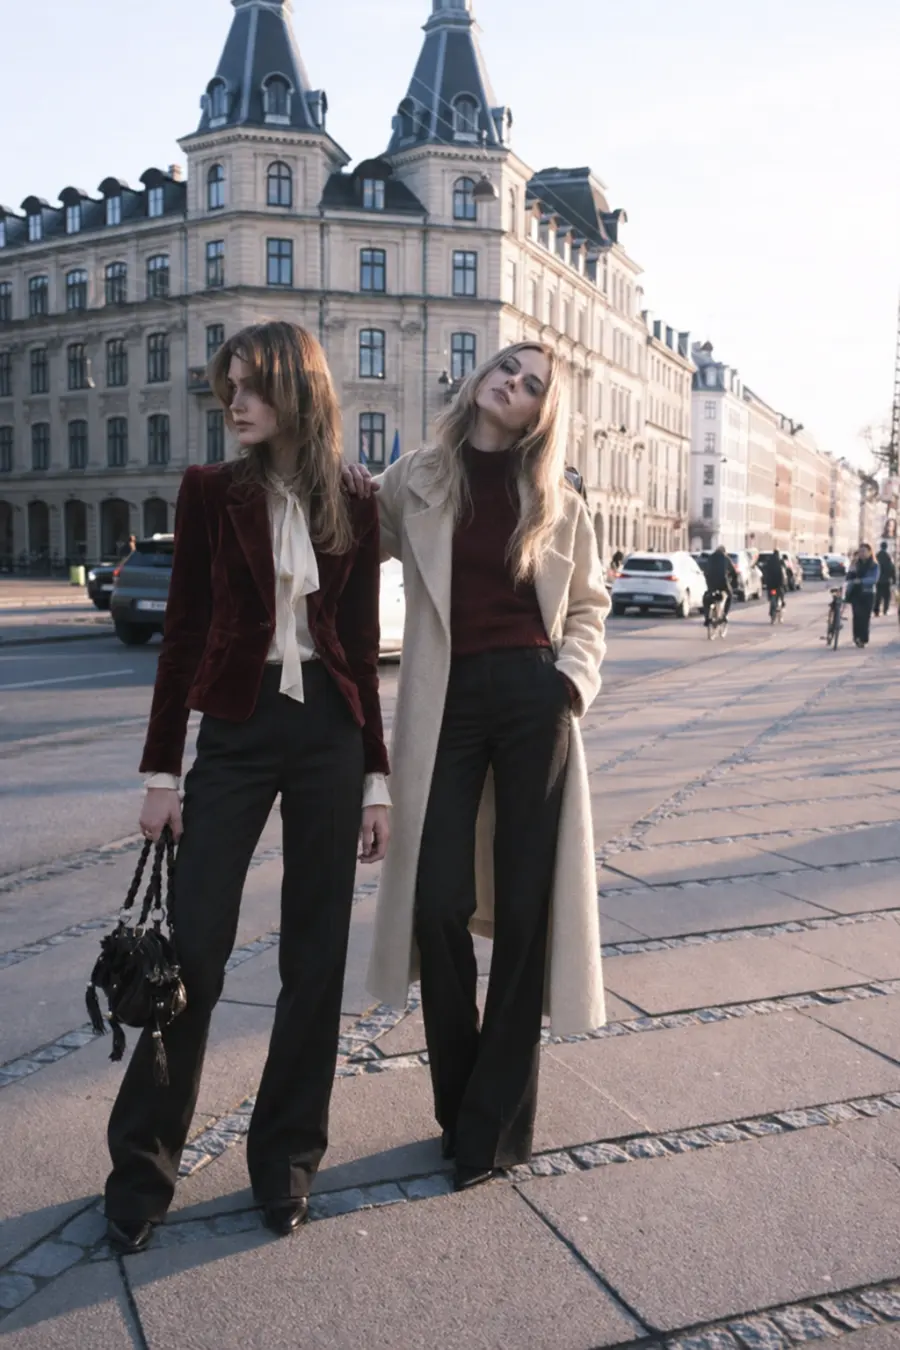
Replace only the clothing worn by the two women. Dress the woman on the left in a fitted deep-burgundy velvet jacket with a cream silk blouse and dark tailored trousers. Dress the woman on the right in a long cream wool coat over a burgundy knit top and dark trousers. Fit every garment naturally to the existing body position and pose.

Preserve:
Keep both women’s faces, identities, skin tones, facial features, hairstyles, expressions, body proportions, poses, hand positions, and positions in the frame unchanged. Preserve the original camera angle, lens perspective, crop, street, buildings, vehicles, pedestrians, daylight direction, shadows, and image dimensions.

Do not add:
Do not add text, logos, hats, jewelry, bags, extra people, new buildings, or new street objects. Do not beautify or retouch their faces.

Output:
Return one photorealistic edited photograph with only the requested clothing replacement.
Score both edits against the same checklist:
| Element |
Vague edit |
Structured edit |
| Faces and identity preserved |
Partial |
Partial, but closer to the source |
| Hairstyles preserved |
Partial |
Mostly preserved |
| Poses and hand positions preserved |
Partial |
Partial; the main pose holds, but one hand shifts into a coat pocket |
| Clothing changed as requested |
Pass for the broad color-and-style request |
Pass for the specified garments |
| Street and buildings preserved |
Partial; multiple small details are redrawn |
Mostly preserved, with small generative changes |
| Lighting and crop preserved |
Partial; the light becomes warmer |
Mostly preserved |
| Existing handbag preserved |
Fail; it changes color and design |
Fail; it is redesigned even though only clothing should change |
What Happened
Attempt A satisfies the broad request, but it treats “vintage fashion” as permission to redesign the scene. The women receive elaborate lace-and-velvet outfits, including a long layered dress and a short corseted look. Their overall positions remain recognizable, but facial details, hair, hands, lower-body poses, lighting, traffic, pedestrians, and the original handbag all shift.
Attempt B is substantially closer to the requested edit. The left woman receives the burgundy velvet jacket, cream blouse, and dark trousers; the right woman receives the cream coat, burgundy knit top, and dark trousers. Their positions, head angles, street layout, crop, and daylight remain much closer to the source.
It is still not a pixel-preserving edit. The right woman’s free hand moves into her coat pocket, faces and background details are regenerated, and the existing black handbag changes shape even though the prompt requests only a clothing replacement. The phrase Do not add bags was also too ambiguous because the source already contained one. A clearer repair would be: Preserve the existing black handbag exactly; do not recolor, replace, remove, or duplicate it.
The useful pattern is simple: Change only X, followed by a concrete preservation list. The list should reflect the asset's real failure cost. For a portrait, that may be the face and pose. For an ecommerce image, it may be the product silhouette, label, printed copy, and camera perspective.
Test 4: How to Reduce Drift across Multiple GPT Image 2.5 Edits
One successful edit does not prove that a workflow is stable. Details can drift when the output passes through several revisions. OpenAI advises using the previous approved output as the next input, making one focused change per round, and repeating critical constraints when they start to move.
Continue from the approved structured result in Test 3.
Round 1: Clothing
Round 1 is the accepted burgundy-and-cream wardrobe edit from Test 3.
Round 2: Add One Handbag
Use the previous approved image as the base.

Make only this new change:
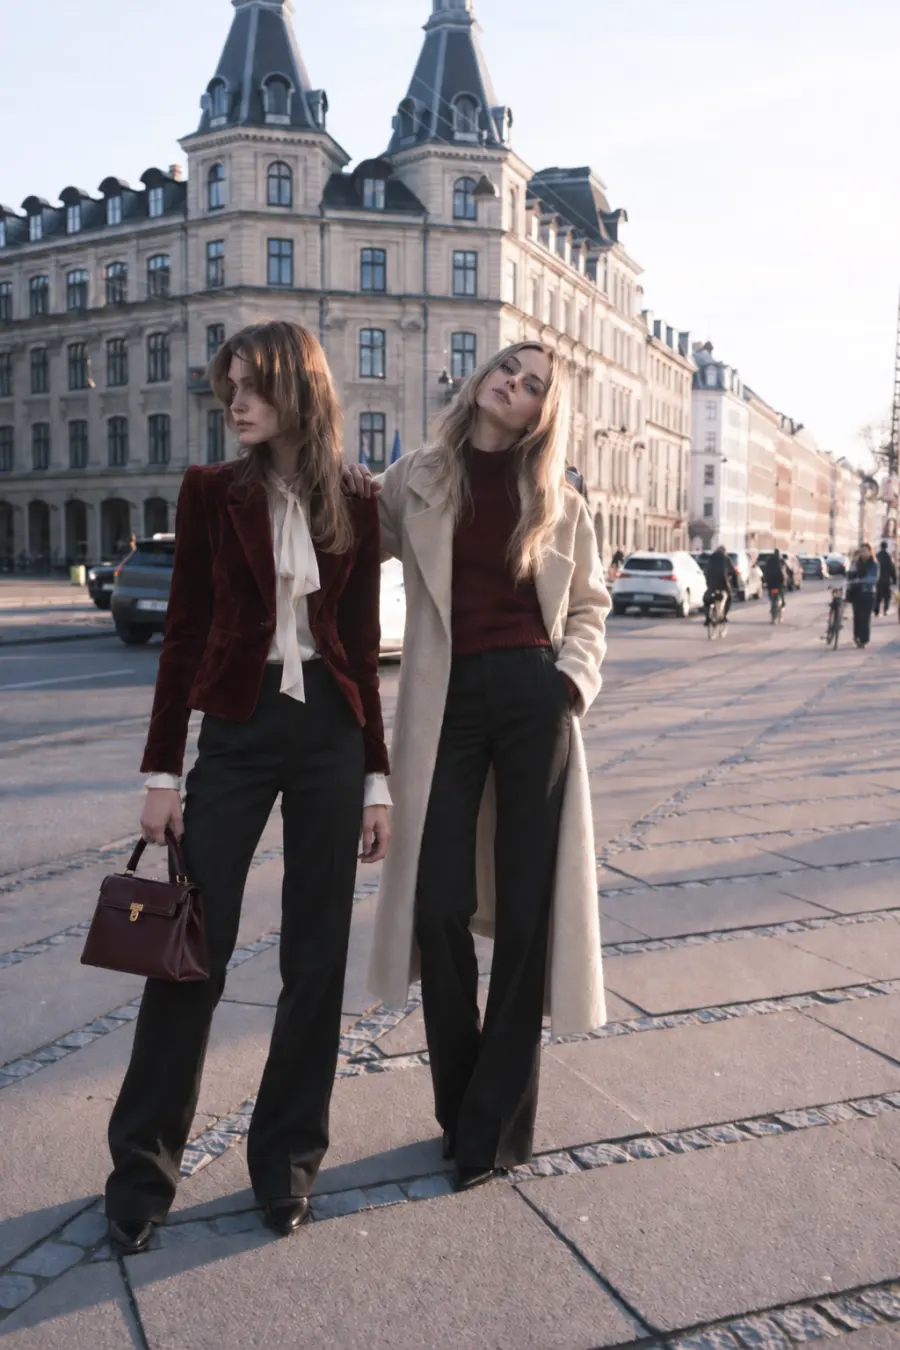
Add one small structured burgundy leather handbag to the left woman’s existing hand. Match its scale, perspective, grip, light, and shadow to the photograph.

Preserve all previously approved details:
Keep both faces, identities, hairstyles, expressions, body proportions, poses, hand positions except for the natural handbag grip, clothing, colors, street, buildings, vehicles, pedestrians, camera angle, crop, and daylight unchanged.

Do not add any other accessory, object, person, text, logo, or watermark.
Round 3: Move the Scene to Golden Hour
Use the previous approved image as the base.

Make only this new change:
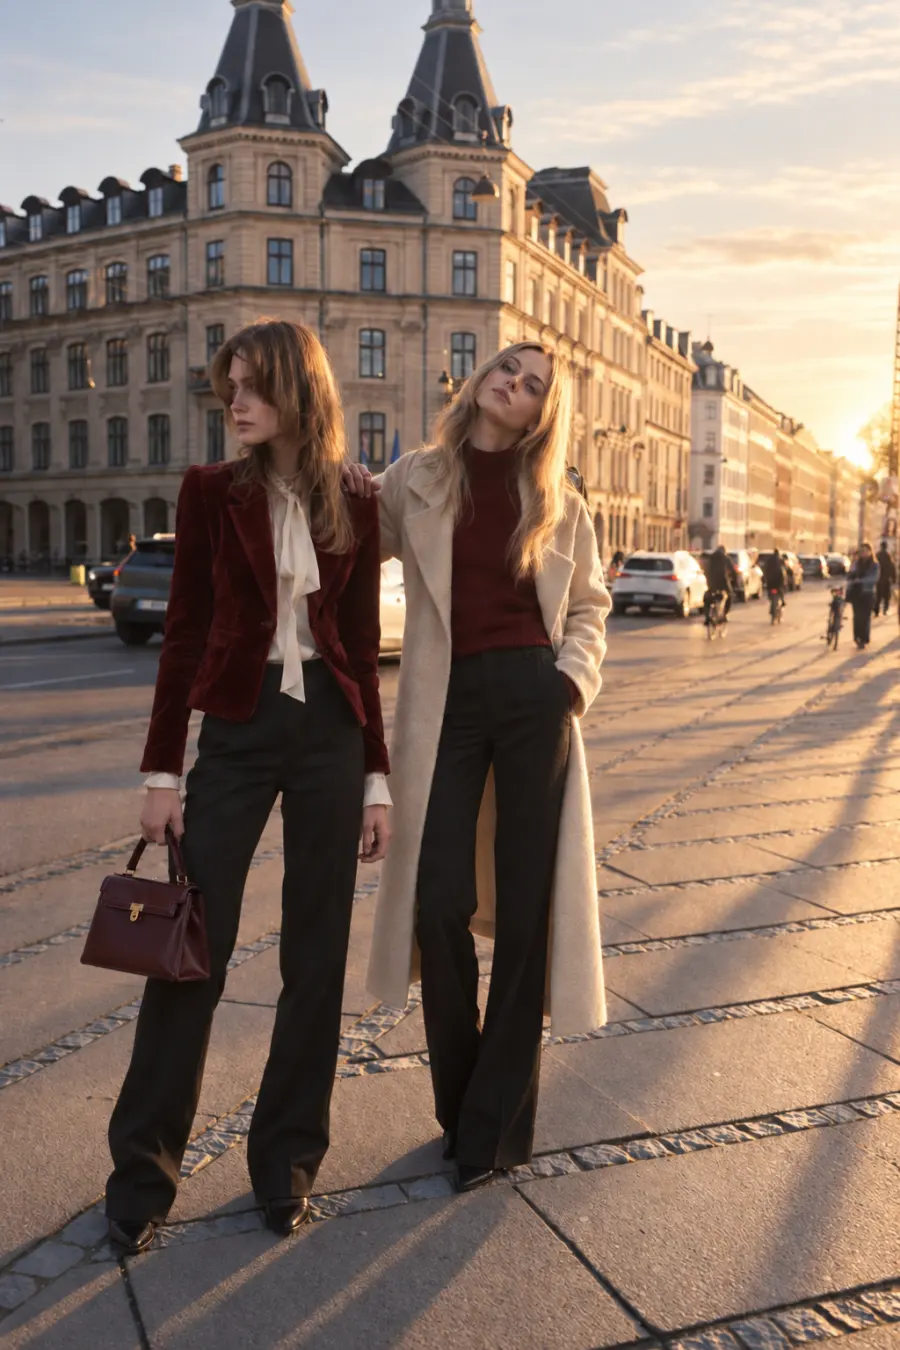
Change the scene from cool daytime light to warm late-afternoon golden-hour sunlight. Let the light come from camera right and create long, believable shadows across the pavement. Keep the color treatment natural rather than heavily orange.

Preserve all previously approved details:
Keep both faces, identities, hairstyles, expressions, body proportions, poses, hand positions, burgundy-and-cream clothing, the burgundy handbag, street layout, buildings, vehicles, pedestrians, camera angle, lens perspective, crop, and image dimensions unchanged.

Do not add or remove people, vehicles, architecture, clothing details, accessories, text, logos, or watermarks.
 Now compare all three rounds, including the areas that were not supposed to change.
| Element |
Round 1 |
Round 2 |
Round 3 |
| Faces and identity |
Baseline |
Mostly preserved |
Mostly preserved |
| Hairstyles |
Baseline |
Preserved |
Preserved |
| Clothing |
Approved wardrobe edit |
Preserved |
Preserved |
| Pose and position |
Baseline |
Preserved apart from the allowed grip adjustment |
Preserved |
| Handbag |
Existing black bag |
Changed to one structured burgundy bag |
Preserved |
| Street composition |
Baseline |
Mostly preserved |
Mostly preserved; lighting and sky change as requested |
| Earlier approved edits retained |
— |
Pass |
Pass |
What Happened
Round 2 made a focused accessory change while retaining the approved clothing, two-person composition, faces, hairstyles, building line, and street perspective. Because Round 1 already contained a black handbag, the model replaced it with a structured burgundy bag instead of literally adding a second one. The visual result matches the intended single-bag outcome, but the instruction would have been more precise as Replace the existing black handbag.
Round 3 successfully moved the scene to golden hour. Warm light enters from camera right, long shadows cross the pavement, and the treatment remains natural rather than becoming uniformly orange. The burgundy handbag, wardrobe, poses, crop, and main architecture survive the third round.
Minor drift remains visible in regenerated facial detail, traffic, pedestrians, pavement texture, and the sky. The core subjects and approved edits are stable enough for a creative workflow, but the sequence does not demonstrate pixel-identical preservation. This is exactly why the previous output, one change per round, and repeated preservation rules are useful: they limit drift without pretending to eliminate it.
Repeated preservation instructions reduce ambiguity; they do not create a pixel lock. If a logo, label, face region, or approved background must remain pixel-identical, composite the accepted edit into the original asset instead of depending on another generation.
Should You Use Flare or Sunburst with These Prompts?
The examples above were created with ChatGPT Images 2.5 in the ChatGPT interface, not with a named API variant. For developers, OpenAI exposes two GPT Image 2.5 API models. Both use the same prompting principles, so the prompts in this guide can be adapted to either model.
| API workflow |
Start with |
Why |
| Prompt rewriting, previews, and frequent variants |
GPT Image 2.5 Flare |
It is the speed-oriented default choice for most API applications. |
| Detail-sensitive final images |
GPT Image 2.5 Sunburst |
It prioritizes image quality and precision, with longer generation times. |
| A difficult identity, text, or product edit |
Flare first, then Sunburst if needed |
Keep the prompt and inputs fixed so the model is the only changed variable. |
OpenAI reports that Flare can reduce latency by up to 50% compared with GPT Image 2, but that is not a fixed result for every request. Prompt complexity, reference images, dimensions, quality settings, and traffic conditions all affect response time.
For the product-level distinction between ChatGPT Images 2.5 and the two API models, see What Is ChatGPT Images 2.5?. For a separate model benchmark, see our GPT Image 2.5 vs GPT Image 2 real tests.
What Goes in the Prompt—and What Belongs in API Parameters?
Prompt instructions describe the image. Request parameters control how the service generates and returns it. Mixing the two can make a test hard to reproduce.
| Put in the prompt |
Set as an API parameter |
| Subject and action |
Model |
| Composition and placement |
Image size |
| Lighting and materials |
Quality level |
| Exact visible text |
Background mode |
| Requested edit |
Output format |
| Preservation rules |
Number of outputs |
| Unwanted visual elements |
Synchronous or asynchronous behavior |
Writing “4K transparent PNG” inside the prompt is not a substitute for setting size, background, and output format in the request. Transparency is a useful example: ask for an isolated subject in the prompt, set the API background to transparent, and return PNG or WebP so the alpha channel can be preserved.
GPT Image 2.5 supports auto, low, medium, high, xhigh, and max quality values. A higher label does not guarantee a better result for every prompt. Approve the composition first, then test one quality change at a time.
How to Test These Prompts on GPT Proto
The simplest route is the GPT Proto AI Image Generator:
Sign in and open the image generator.
Select GPT Image 2.5 Flare or Sunburst.
Paste the prompt.
Upload the original image when running an edit.
Keep the model, size, and quality fixed during an A/B prompt test.
Generate the image and score it against the relevant checklist above.
For API testing, the current GPT Proto model page documents this text-to-image request for Flare. Set GPTPROTO_API_KEY in your environment before running it.
curl --request POST "https://gptproto.com/api/v3/openai/gpt-image-2.5-flare/text-to-image" \
  --header "Authorization: Bearer $GPTPROTO_API_KEY" \
  --header "Content-Type: application/json" \
  --data '{
    "prompt": "Create a vertical editorial portrait photograph of an adult woman with shoulder-length chestnut curls. Frame her from the upper chest upward. Warm late-afternoon sunlight passes through an ivory lace veil and casts a natural shadow pattern across one side of her face. Preserve visible skin texture, individual hair strands, velvet texture, and fine lace detail. No text, logo, watermark, beauty-filter smoothing, or glossy commercial retouching.",
    "n": null,
    "quality": "medium",
    "size": "1024x1536",
    "enable_sync_mode": false,
    "response_format": "url"
  }'
To test Sunburst, use its model page and change the endpoint from gpt-image-2.5-flare to gpt-image-2.5-sunburst. Do not compare models while also rewriting the prompt or changing the image size; you will no longer know which variable caused the difference.
Four Copy-and-Paste GPT Image 2.5 Prompt Templates
The examples above are specific. These templates are designed to be reused. Replace the bracketed fields rather than copying every detail unchanged.
Realistic Photo Prompt Template
Create a [orientation] [type of photograph] of [adult subject and visible attributes].

Composition:
[Framing, viewpoint, crop, gaze, pose, subject placement, and negative space.]

Lighting and environment:
[Light source and direction], in [environment and time of day].

Visible detail:
Preserve [skin, hair, fabric, product, surface, and environmental textures].
Use [color and photographic treatment].

Avoid:
No [retouching style, unwanted objects, text, logos, watermarks, or visual artifacts].
Exact-Text Poster Prompt Template
Create one [format] poster for [audience and use].

Visual direction:
[Palette, layout, graphic subject, typography style, texture, and hierarchy.]

Render these text elements exactly once each:


1. “[BRAND]” — [position and type treatment].


2. “[HEADLINE]” — [position and hierarchy].


3. “[SUPPORTING COPY]” — [position and hierarchy].

Spelling, capitalization, numbers, and punctuation must match the quoted copy exactly.
Do not add, repeat, abbreviate, translate, or replace any words.
No other text, letters, logos, signatures, or watermarks.
Controlled Image-Editing Prompt Template
Requested change:
Change only [target element] to [new requirement].

Preserve:
Keep [identity, face, product geometry, pose, layout, labels, lighting, shadows,
camera angle, background, and dimensions] unchanged.

Do not add:
Do not add [unwanted people, objects, text, logos, accessories, or scenery].

Output:
Return [format and intended use] with only the requested change.
Multi-Turn Editing Prompt Template
Use the previous approved image as the base.

Make only this new change:
[One focused edit.]

Preserve all previously approved details:
[List the identity, composition, and earlier edits that must remain.]

Do not add, remove, or redesign:
[Protected elements and unwanted additions.]
Common GPT Image 2.5 Prompting Mistakes
| Mistake |
Better approach |
| Stacking vague adjectives |
Describe visible light, material, action, and composition. |
| Treating a longer prompt as automatically better |
Include requirements that can be checked in the result. |
| Editing without preservation rules |
Separate the change from the protected details. |
| Requesting several major edits at once |
Make one important change per round. |
| Hiding exact copy in a paragraph |
Quote, count, and position every required line. |
Assuming max will repair a weak brief |
Test prompt clarity and quality settings as separate variables. |
| Rewriting the prompt while changing models |
Hold the prompt and request settings constant first. |
| Expecting pixel-identical preservation |
Use compositing when exact stability is required. |
A prompt is not successful because it sounds sophisticated. It is successful when the output can pass a defined acceptance check.
Final Takeaway
Start by naming the image you need. Describe requirements that can be seen and checked. For an edit, give the model both sides of the boundary: what should change and what must stay fixed.
Then change one variable at a time. Keep the failed output, because it often reveals the missing instruction more clearly than another page of generic prompting advice.
Try these prompts with GPT Image 2.5, start fast with GPT Image 2.5 Flare, or test GPT Image 2.5 Sunburst when final-detail and editing precision matter more than generation time.