Anime-to-Real Transformation vs Full Live-Action Conversion
“Anime-to-real-life video” can describe two different jobs. They should not be treated as the same workflow.
| Goal |
Best workflow |
Main trade-off |
| Make one anime image transform into a realistic person |
Create a matched anime and realistic image pair, then generate the transition with first-and-last-frame control |
Fast and easy to direct, but designed for a short reveal rather than a complete scene |
| Convert an existing anime scene into live-action footage |
Extract the source video into frames, restyle the frames, and reconstruct the video |
Covers a full scene, but requires more processing and tighter frame-to-frame consistency |
This guide focuses on the first result: a short transformation video for TikTok, YouTube Shorts, Reels, an intro, or a character compilation. You do not need to extract hundreds of frames. Two carefully matched images do most of the visual work.
Step 1: Choose an Anime Image That Can Survive the Transformation
The first frame tells the image model who the character is. It also determines how difficult the later video transition will be.
Start with one main character whose face, hair, clothing, and signature accessories are visible. A portrait or half-body composition is usually easier to translate than a crowded action scene because the model does not need to separate overlapping people, weapons, effects, and background objects.
Use a source image with:
One clearly visible main character
An unobstructed face
A readable expression and pose
Visible hair shape and hair color
Enough of the outfit to identify its silhouette and colors
Any important earrings, glasses, headwear, markings, weapons, or jewelry in frame
A clean background without dense text or heavy compression artifacts
Space around the character if you plan to crop the result vertically
Avoid severe cropping. When the top of the head, hands, costume, or an important accessory is missing, the generator has to invent the hidden area. That invention can then become a mismatch between the first and last frames.
The safest source is not necessarily the most dramatic one. A clean character portrait gives you less motion to work with, but it also gives the model fewer opportunities to redesign the subject.
Before uploading the image, decide where the final video will be published. For a TikTok, Reel, or YouTube Short, begin with a composition that works in a vertical canvas. Reframing after generation can remove hair, hands, and accessories that were supposed to remain visible throughout the transformation.
Step 2: Create the Real-Life Version of the Character
Open GPT Proto Anime to Real Life AI, upload the anime image, and select Generate. The tool applies a fixed anime-to-real treatment, so this stage does not require an image prompt.
The output is a new realistic interpretation, not a photographic copy of the source. Anime anatomy, line art, flat shading, and drawn materials must be translated into human proportions, skin, hair, fabric, depth, and camera-like lighting. Some variation is expected.
What matters is whether the two images form a usable pair.
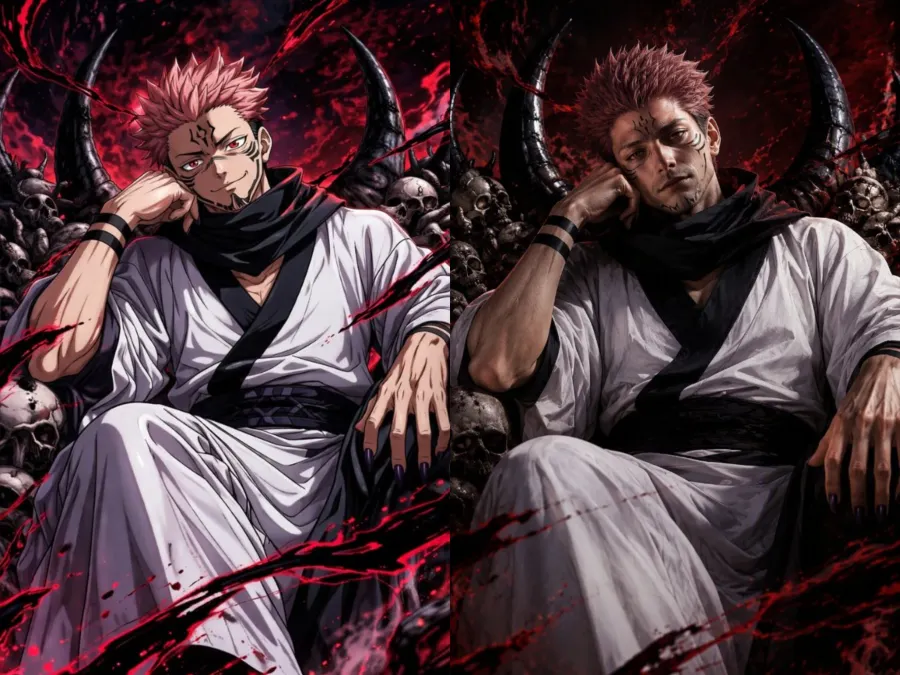
Compare the result against the source before moving to video:
| Check |
What should remain recognizable |
| Subject |
Same number of characters and the same general identity |
| Composition |
Similar crop, camera angle, and subject position |
| Pose |
Similar head direction, shoulder angle, hand placement, and body position |
| Expression |
The same emotional read, such as calm, serious, shy, or excited |
| Face and age |
A believable realistic interpretation of the same apparent age range and gender presentation |
| Hair |
Hairstyle, length, fringe, hair color, and major ornaments |
| Eyes |
Eye color and gaze direction when visible |
| Outfit |
Clothing type, main colors, silhouette, and important materials |
| Accessories |
Glasses, earrings, necklaces, headwear, weapons, markings, or other signature details |
| Scene |
Similar background layout, light direction, palette, and visual balance |
Regenerate the realistic image if several major details change at once. Do not rely on the video model to repair a mismatched pair. Its job is to connect the frames, not to decide which version of the character was correct.
A small difference is manageable. A different face angle, missing jacket, new background, and altered hairstyle in the same image is not.
Step 3: Generate the First-and-Last-Frame Video
Go to GPT Proto AI Video and select a video model or mode that supports first-and-last-frame generation. Available inputs vary by model, so check that the selected route exposes both a starting image and an ending image before generating.
Then set up the clip:
Upload the anime image as the first frame.
Upload the realistic image as the last frame.
Choose the aspect ratio that matches your planned edit.
Select the available duration and resolution.
Add a transformation prompt.
Enable generated audio only when the selected model supports it and you want sound in the initial render.
Generate the clip and review the entire transition, not just the final frame.
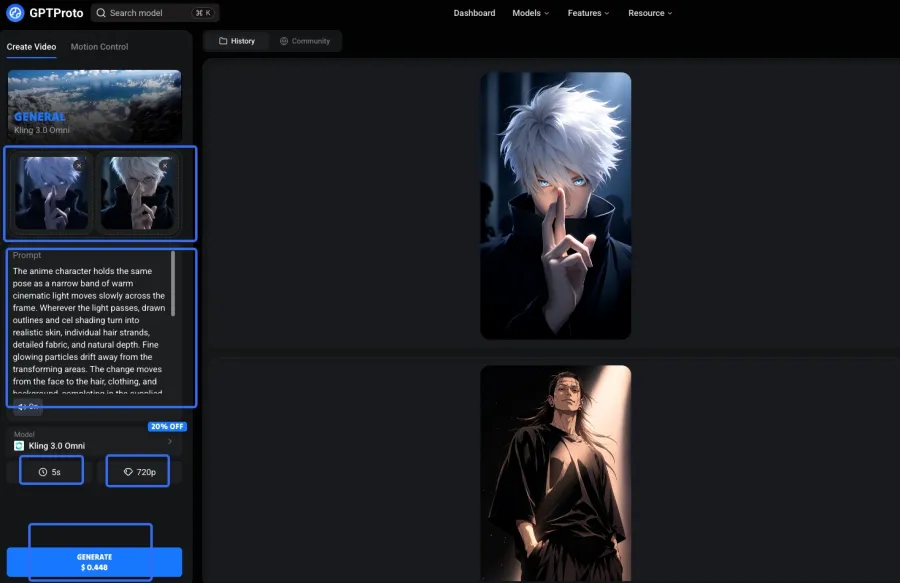
The first and last frames define the visual endpoints. The prompt should describe the journey between them.
Do not spend most of the prompt repeating every detail already visible in the images. Instead, control how the illustrated textures become realistic, how quickly the change happens, what the character does, whether the camera moves, and which details must not drift.
Anime-to-Real-Life Transformation Prompt Formula
Use this structure for a first-and-last-frame transformation:
[subject and identity lock] + [transformation action] + [timing] + [small character motion] + [camera behavior] + [visual effects] + [sound direction] + [details that must not change]
The identity lock matters most. Name the hairstyle, outfit, accessories, pose, framing, and background only when they must remain stable. The goal is not to redesign the character on the way to the realistic frame.
Prompt 1: Clean Anime-to-Real Facial Transformation
Use this for a portrait or half-body character when you want the transformation itself to remain easy to read.
The same single character remains centered in the same pose and framing throughout the shot. The illustrated face gradually transforms into a believable live-action human face: flat cel shading becomes natural skin texture, drawn hair becomes individual realistic strands, and the anime eyes transition into natural human proportions while preserving the original eye color and gaze. The character makes one subtle blink and breathes naturally. Static camera, stable background, smooth continuous transformation, no cut.

Preserve the same apparent age range, gender presentation, hairstyle, hair color, expression, outfit design, clothing colors, accessories, pose, subject count, and background composition. Do not add or remove objects. No distorted face, duplicate features, extra limbs, sudden camera movement, text, logo, or watermark.
This is the safest starting prompt. The motion is deliberately small. That gives the model more capacity to handle the difficult part: changing the visual language without losing the character.
Prompt 2: Cinematic Live-Action Reveal
Use this when the first and last frames already match closely and you want a more visible transformation effect.
The anime character holds the same pose as a narrow band of warm cinematic light moves slowly across the frame. Wherever the light passes, drawn outlines and cel shading turn into realistic skin, individual hair strands, detailed fabric, and natural depth. Fine glowing particles drift away from the transforming areas. The change moves from the face to the hair, clothing, and background, completing in the supplied live-action final frame. Slow controlled camera push-in, one natural blink, subtle hair movement, continuous shot.

Keep the character recognizable at every moment. Preserve the original face direction, expression, apparent age range, hairstyle, hair and eye colors, outfit, accessories, body position, framing, and scene layout. No new costume, no new person, no abrupt cut, no body distortion, no added text or symbols.
The light sweep gives the model a visible reason for the style change. The cost is complexity: particles, camera movement, hair motion, and material changes can introduce more drift. If the first result becomes unstable, remove the camera push and reduce the particle effect.
Prompt 3: Fast Vertical Reveal for TikTok or YouTube Shorts
Use this when the clip will be combined with several other character transformations.
Vertical anime-to-live-action character reveal. The same character remains in the center of the frame. Begin with the supplied anime artwork, hold briefly, then trigger a fast wave of light from bottom to top. The illustrated face, hair, outfit, and background transform into the supplied realistic final frame in one continuous motion. Finish with a short clean hold on the live-action character looking toward the camera. Fixed composition, minimal body movement, clear transformation timed for a music beat.

Maintain the same character identity, pose, expression, hairstyle, hair color, eye color, outfit silhouette, accessories, background layout, and number of subjects. No camera-angle change, no added person, no costume redesign, no warped hands, no flicker, no text, and no logo.
The final hold is important when several clips will be edited together. Without it, the viewer sees motion but has no time to register the realistic result.
Step 4: Plan the Sound Instead of Treating It as an Afterthought
The visual transformation supplies the reveal. Sound tells the viewer when to feel it.
There are two workable routes. Choose one based on the selected video model and how much control you want during editing.
Generate Sound with the Video
If the selected model supports generated audio, describe a small number of sounds that correspond to visible actions. Keep the direction concrete.
For example:
Audio: a soft rising shimmer during the transformation, a clean magical whoosh as the light crosses the face, subtle fabric movement, and a restrained cinematic impact when the live-action form is complete. No speech and no background music.
Sound effects are easier to align than a full song because they follow specific visual events. Asking for dialogue, music, environmental ambience, several effects, and a complex transformation in one generation gives the model more relationships to solve.
Add Music and Sound Effects During Editing
Post-production gives you more timing control. A simple sound stack is enough:
A short rise before the transformation
A whoosh, shimmer, or energy sound during the visual change
One impact on the frame where the realistic character becomes clear
Low background ambience after the reveal
Music underneath the full compilation
Place the strongest beat on the visual moment where the face becomes realistic. For a multi-character compilation, reuse the same transition sound or the same rhythmic position. The characters can change; the editing grammar should not.
Use music and effects you have the right to publish. A track available inside a social platform may not carry the same permissions when the video is reposted elsewhere or used commercially.
Step 5: Edit Several Transformations into One Video
A single anime-to-real transformation works as a demonstration. A sequence works as a format.
Generate each character as a separate clip, then place the clips on one timeline. Editing them individually gives you room to replace one weak result without regenerating the entire video.
For a cleaner compilation:
Use one aspect ratio for every image and video clip.
Keep the character at a similar size and position across scenes.
Reuse one prompt structure, then change only the character-specific details.
Give each transformation a similar rhythm.
Put the most immediately recognizable or visually surprising result first.
Cut on a music beat or transformation impact.
Leave a short hold after each realistic reveal.
Use one caption position, type style, and safe area throughout the video.
End on a frame that can cut or loop back to the opening without a long pause.
Do not hide a weak transformation behind a faster cut. Viewers notice unstable faces even when the clip is short. Replace the image pair or simplify the motion prompt instead.
Format the Video for TikTok and YouTube
The generation settings and the editing canvas should match. Mixing horizontal source images, vertical generated clips, and square exports usually produces awkward crops or empty space.
| Destination |
Starting format |
What to prioritize |
| TikTok and Reels |
9:16 vertical |
Immediate visual hook, centered character, readable mobile crop, music and effects |
| YouTube Shorts |
Vertical or square |
Clear transformation, short final hold, an ending that can loop or cut cleanly |
| Regular YouTube video |
16:9 horizontal |
Longer character compilation, more context, side-by-side comparisons, or process footage |
For vertical videos, keep the face and defining accessories away from interface-heavy edges. Check the final export on a phone before publishing. A composition that looks balanced in a desktop editor can feel cramped once captions, buttons, and platform controls are visible.
How to Fix Common Anime-to-Real Video Problems
Most failed transformations come from either a mismatched image pair or an overloaded motion prompt.
| Problem |
Likely cause |
Fix |
| The face becomes a different person halfway through |
The anime and realistic faces use different angles, expressions, or framing |
Generate a closer realistic match and reduce head movement |
| The hairstyle or outfit changes |
The end image redesigned important character details |
Regenerate the realistic image with the original silhouette, colors, and accessories visible |
| The transition looks like melting |
The two frames differ too much in pose or composition |
Align the images more closely and use a fixed camera |
| The result is only a basic crossfade |
The prompt describes the endpoints but not the physical transformation |
Describe how line art, skin, hair, fabric, light, and depth change over time |
| Hands or limbs distort |
The source pose is complex or the prompt adds large body movement |
Use a portrait or half-body source and keep movement subtle |
| The camera jumps before the reveal |
The prompt combines camera motion with major subject changes |
Remove the camera move and generate the style transition first |
| The realistic result appears too briefly |
The transformation consumes the whole clip |
Ask for a clear hold after the live-action form is complete |
| Several clips feel unrelated |
Their ratios, timing, effects, or sound cues differ |
Reuse one generation and editing template across the series |
| The clip feels flat without sound |
The transition has no audible buildup or impact |
Add a rise, transformation effect, and final impact during editing |
Change one variable at a time when troubleshooting. If you regenerate with a new end frame, new motion, new camera, new effects, and new duration all at once, you will not know which change fixed—or broke—the result.
Can You Convert an Entire Anime Scene into Live Action?
Yes, but a full scene needs a different workflow from the two-frame transformation above.
A first-and-last-frame video asks the model to create one plausible route between two visual endpoints. Converting an existing anime scene asks it to preserve the motion, shot changes, acting, timing, and scene structure of the source while replacing the entire visual treatment.
The usual process is:
Split the anime clip into sequential frames.
Organize or batch the frames for image conversion.
Apply the same live-action direction to every batch.
Check recurring characters, clothing, objects, and lighting for drift.
Reconstruct the frames at the source frame rate.
Restore or rebuild the audio track.
This route makes sense when the original performance and camera movement must remain. It also creates far more consistency work. For a TikTok or YouTube transformation reveal, the two-image workflow is usually the more practical choice.
Rights, AI Labels, and Responsible Publishing
An AI tool changes the medium of an image; it does not give you ownership of the original character, artwork, logo, music, or video clip.
Use your own character art, commissioned work with suitable permissions, licensed assets, or material you are otherwise allowed to modify and publish. Do not present an unofficial realistic interpretation as an official live-action design or as work endorsed by the original artist or rights holder.
Commercial use depends on the rights attached to the source artwork, character, audio, and generated output, along with the terms that apply to the selected model and publishing platform. Check those terms before selling, advertising, or distributing the result.
Realistic AI-generated images and videos may also require an AI-content label or disclosure on the platform where you publish them. Review the current TikTok, YouTube, or other platform settings during upload rather than assuming the rule is identical everywhere.
Make Your First Anime-to-Real-Life Transformation
Start with the still images. Use GPT Proto Anime to Real Life AI to create a realistic interpretation that keeps the character recognizable, then take the matched pair to GPT Proto AI Video and generate the transition between them.
The quality of the video will depend less on how many effects you list and more on whether the two frames already describe the same character. Match the identity first. Animate second.