The AI Vlog Workflow at a Glance
This is not a talking-avatar workflow. The character changes locations, interacts with props, and appears in four separately composed shots.
| Stage |
Tool |
What You Create |
| 1 |
Seedream 5.0 Pro |
One clean identity master image |
| 2 |
Seedream 5.0 Pro |
Four scene keyframes using the same character |
| 3 |
Seedance 2.0 |
One 15-second, four-shot vlog with ambient sound |
| 4 |
Seedance 2.0 |
The same video with voice-over and burned-in subtitles |
For this example, I used a 4:3 canvas because the original source material was already 4:3. If your final destination is TikTok, Instagram Reels, or YouTube Shorts, start with 9:16 reference images instead. Do not plan to crop a finished 4:3 video into a vertical frame later; the crop may remove the character's hands, coffee cup, or part of her head.
You can create the images in the GPT Proto AI Image Gallery, use Seedream 5.0 Pro for the reference-image stages, and generate the video with Seedance 2.0.
What You Need Before You Start
Prepare these six items before opening the video generator:
One identity master image with a clear, unobstructed face
Four scene keyframes showing the same character
A simple 15-second shot plan
A short voice-over script
A Seedance prompt with exact shot timings
Enough credit for at least two test generations
Seedance 2.0 officially supports mixed reference inputs of up to nine images, three video clips, and three audio clips. It can also generate a 15-second multi-shot video with audio, so one identity image plus four scene images fits within its reference capacity. See the official Seedance 2.0 launch notes.
The practical limit is not the number of uploaded files. It is how much conflicting information you ask the model to reconcile. Five carefully matched references are more useful than nine images showing slightly different faces, hairstyles, or outfits.
Step 1: Plan a Simple 15-Second Story
Start with the timeline, not the prompt. Each shot in this example has one location and one small action.
| Time |
Scene |
Main Action |
| 0.0–3.3 seconds |
Kitchen |
Lift a ceramic mug and smile toward the window |
| 3.3–7.0 seconds |
Neighborhood street |
Walk slowly and glance toward the phone |
| 7.0–11.0 seconds |
Cafe |
Take one sip, set down the glass, and look at the laptop |
| 11.0–15.0 seconds |
Rooftop |
Look toward the skyline, then back at the lens |
Four locations in 15 seconds is already ambitious. Resist the urge to add a door opening, outfit change, camera orbit, product reveal, and three hand gestures to the same shot. Every extra action gives the model another chance to distort a hand, prop, face, or transition.
For a first attempt, use one action per shot and hard cuts between locations. You can make the next version more complex after the basic structure works.
Step 2: Create One Identity Master Image
For a simple one-off vlog, the identity master is the canonical image that defines the character's face. Use a front-facing or slightly turned portrait with both eyes visible, even lighting, and no cup, phone, hand, sunglasses, or hair covering important facial details.
If you are building a recurring character or a longer vlog series, you can create a character asset library instead. This is more work, but verified front, three-quarter, side-profile, full-body, and expression references give the image model less identity information to invent when the camera angle or pose changes. Every asset should still be derived from the same identity master and checked before use.
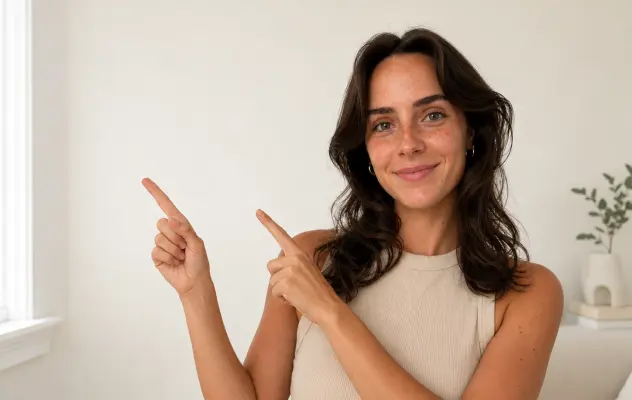
For this example, I started from a clear frame of the synthetic woman I wanted to keep. I then generated a cleaner 4:3 portrait that preserved her freckles, facial proportions, center-parted dark brown hair, and small gold earrings.
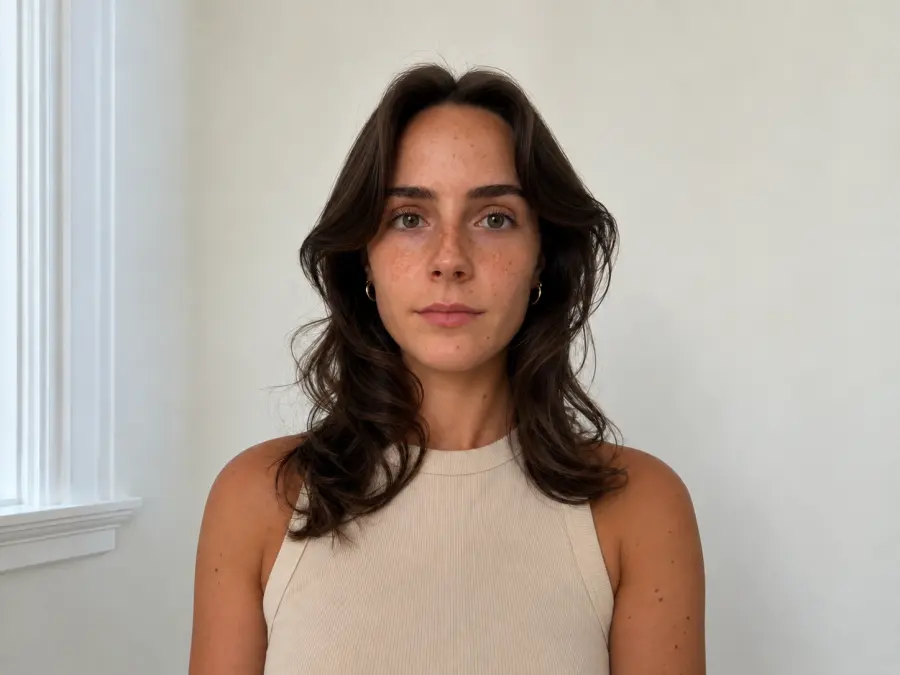
Use a prompt like this with your source image attached:
Create a clean 4:3 identity reference portrait of the exact same adult woman in @SourceImage.

Preserve her facial identity, eye shape and color, eyebrows, nose, lips, jawline, freckles, skin tone, apparent age, hairline, center part, dark brown wavy hair, and small gold hoop earrings.

Show her from the chest up, facing the camera with a relaxed neutral expression. Use soft natural window light, realistic skin pores, individual hair strands, and an ordinary smartphone-photo look.

Keep both eyes fully visible. Keep her face unobstructed. Use a plain, softly lit background.

Do not beautify or redesign her face. Do not change her age, hairstyle, hair color, skin tone, makeup, earrings, or body proportions. No cup, phone, hands, text, logo, watermark, beauty filter, waxy skin, cartoon rendering, or dramatic studio lighting.
Before moving on, check the result at full size. A polished portrait is not automatically a useful identity reference. If the image generator changed the nose, narrowed the jaw, removed the freckles, or gave the character a different hairline, regenerate it now. Video generation will not reliably repair a mismatch that already exists in the source images.
Step 3: Create Four Scene Keyframes with the Same Character
Next, place the identity master into each location with Seedream 5.0 Pro. The goal is not to generate four beautiful but unrelated lifestyle photos. The goal is to create four frames that already look like consecutive moments from one person's day.
Use the identity image as the character reference every time. Keep the same hairstyle, outfit, earrings, apparent age, and body proportions across all four images. If you built a character asset library, pair the identity master with only the verified angle or pose reference that best matches the scene. Do not attach the entire library to every prompt; too many near-duplicate references can introduce new conflicts.
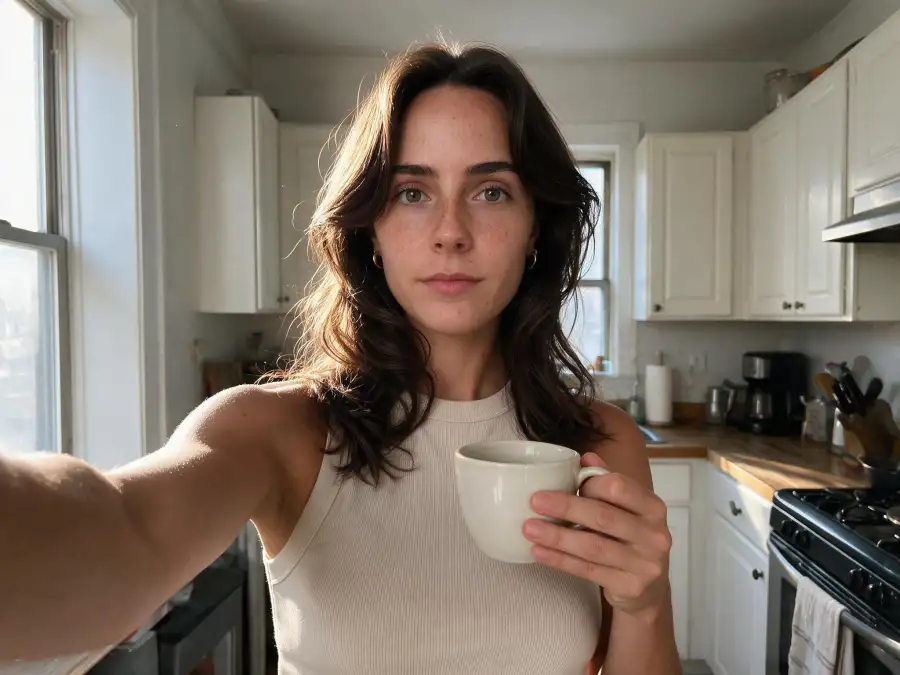
Kitchen Keyframe Prompt
Use @IdentityMaster as the sole identity reference.

Create a realistic 4:3 smartphone-vlog keyframe of the exact same adult woman standing in a modest apartment kitchen in soft morning light.

Preserve her exact face, freckles, eye shape, nose, lips, jawline, hairline, center-parted dark brown wavy hair, small gold hoop earrings, outfit, apparent age, and body proportions from @IdentityMaster.

She holds an off-white ceramic coffee mug at chest height and looks naturally toward a nearby morning window with a small sleepy smile. Use an informal front-camera composition, mild wide-angle distortion, ordinary natural light, and slightly imperfect personal-vlog framing.

Keep her face and both hands fully visible. The mug must have a stable shape and no text or logo.

Do not redesign the woman, change her hairstyle or outfit, add another person, create a beauty-filter look, or add text, branding, or a watermark.
Street Keyframe Prompt
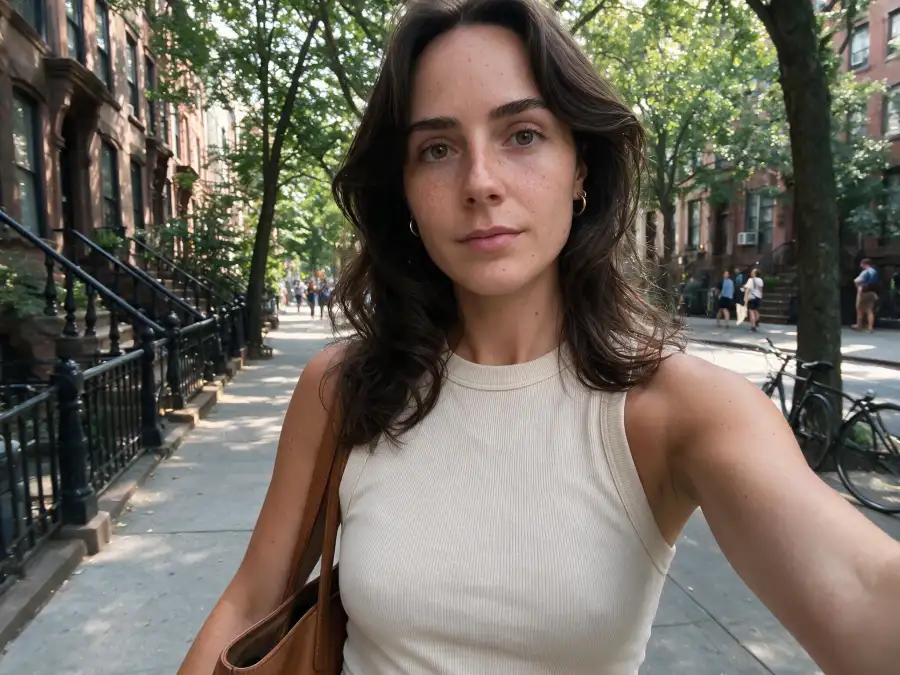
Use @IdentityMaster as the sole identity reference.

Create a realistic 4:3 smartphone-vlog keyframe of the exact same adult woman walking slowly along a quiet neighborhood street during the same day.

Preserve her exact face, freckles, eye shape, nose, lips, jawline, hairline, center-parted dark brown wavy hair, small gold hoop earrings, outfit, apparent age, and body proportions from @IdentityMaster.

She records herself at arm's length while walking at a natural pace. She glances briefly toward the surroundings and then back toward the phone. Use soft daylight, realistic pavement and buildings, mild front-camera distortion, and casual handheld framing.

Her hair remains down with the same length, color, center part, and overall shape. No bun, ponytail, hat, sunglasses, or outfit change.

No duplicated character, crowd blocking her body, text, shop logo, watermark, distorted hands, or glossy fashion-campaign styling.
Cafe Keyframe Prompt
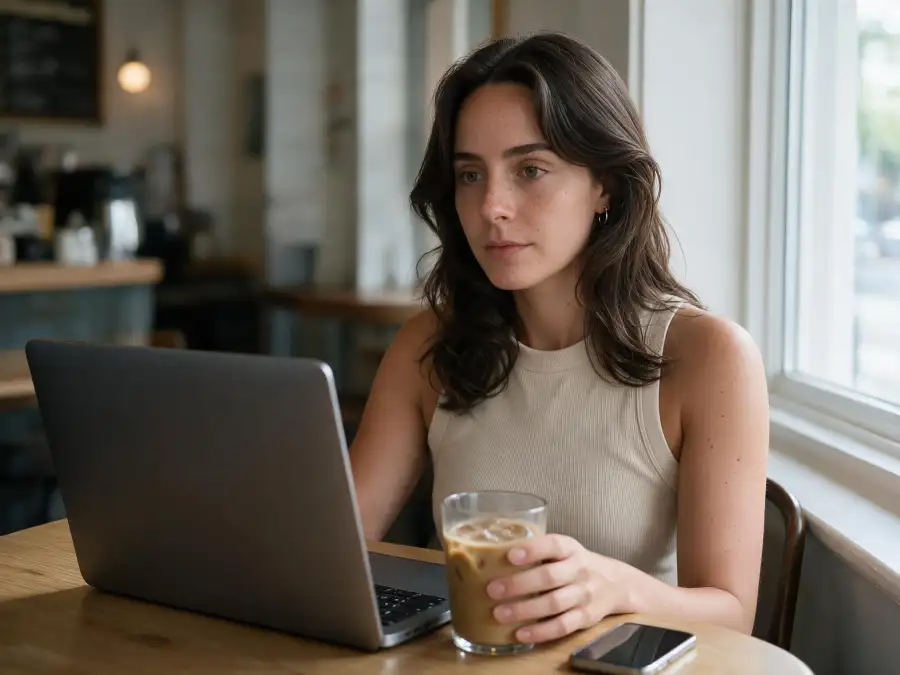
Use @IdentityMaster as the sole identity reference.

Create a realistic 4:3 smartphone-vlog keyframe of the exact same adult woman seated at a wooden cafe table.

Preserve her exact face, freckles, eye shape, nose, lips, jawline, hairline, center-parted dark brown wavy hair, small gold hoop earrings, outfit, apparent age, and body proportions from @IdentityMaster.

The phone is stationary across from her. Place one clear glass of iced coffee and one open, unbranded laptop on the table. She holds the glass naturally after taking a small sip and looks toward the laptop.

Use subdued cafe activity in the background, ordinary window light, realistic skin and fabric texture, and a casual personal-vlog composition. Keep her hands, glass, and laptop stable and clearly separated.

No brand names, screen text, extra drinks, duplicated fingers, warped glass, distorted laptop, beauty filter, logo, or watermark.
Rooftop Keyframe Prompt
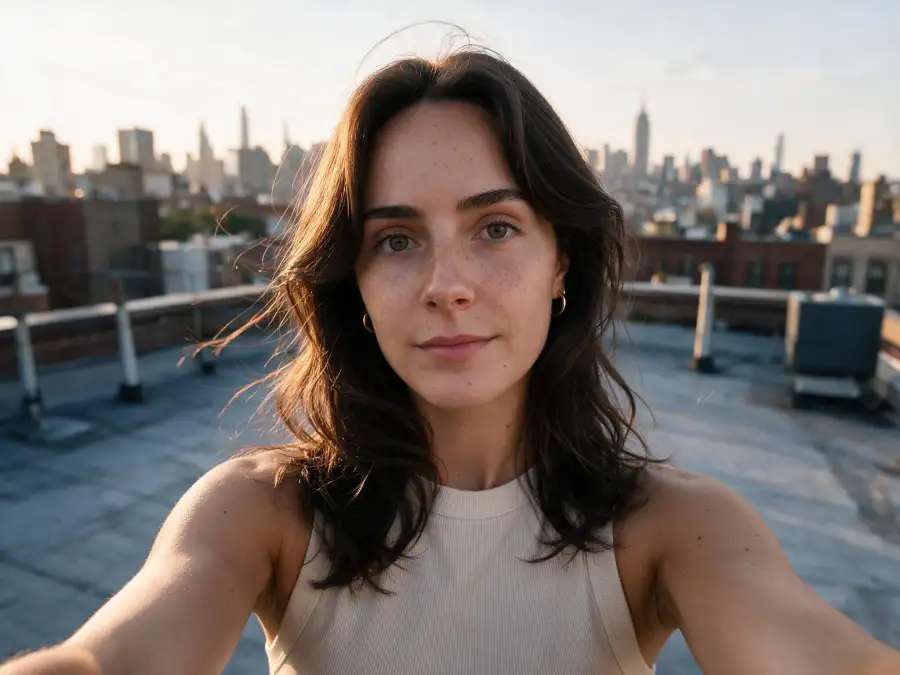
Use @IdentityMaster as the sole identity reference.

Create a realistic 4:3 smartphone-vlog keyframe of the exact same adult woman on a modest apartment rooftop at sunset.

Preserve her exact face, freckles, eye shape, nose, lips, jawline, hairline, center-parted dark brown wavy hair, small gold hoop earrings, outfit, apparent age, and body proportions from @IdentityMaster.

She records herself at arm's length. The city skyline is visible behind her in warm, ordinary sunset light. A light breeze moves only a few loose strands of hair without changing its length, color, center part, or overall style. She gives a small genuine smile rather than posing like a fashion model.

Use mild front-camera distortion, realistic skin texture, subtle exposure adjustment, and imperfect handheld composition.

No different hairstyle, dramatic wind, cinematic crane shot, glossy advertising light, extra person, text, logo, or watermark.
Compare the images before sending them to Seedance. Look specifically at the face width, nose, lip shape, freckles, hairline, center part, earrings, and outfit. If one scene looks like a different person, remake that still first.
Step 4: Bind the References Correctly in Seedance
Uploading the files is not enough. The prompt must point to the actual reference tokens created by the platform.
Your interface may display them as @Image 1, @Image 2, or custom material names. Use the tokens inserted by the platform, not a filename typed as plain text.
For example:
@mias_identity is the sole identity reference.

@kitchen_scene defines only Shot 1's location, composition, lighting, and props.
@street_scene defines only Shot 2's location and composition.
@cafe_scene defines only Shot 3's location, composition, and props.
@rooftop_scene defines only Shot 4's location, composition, and lighting.

The scene references must not replace or reinterpret the face from @mias_identity.
The labels above are examples. Replace them with the real @ references shown in your Seedance workspace.
A filename such as kitchen_keyframe.jpg helps you stay organized, but the filename itself does not bind the image to the prompt. If you type “Reference Image 1” without inserting the platform's actual image token, the model may treat it as an abstract instruction and invent the missing visual information.
Step 5: Generate the Raw Four-Shot AI Vlog
Open Seedance 2.0 on GPT Proto, upload the five reference images, select the same 4:3 aspect ratio used by the keyframes, and generate a 15-second clip.
Use the following prompt after replacing the example asset names with your real material references:
Generate one realistic 15-second 4:3 multi-shot smartphone vlog using @mias_identity, @kitchen_scene, @street_scene, @cafe_scene and @rooftop_scene.

IDENTITY PRIORITY

@mias_identity is the sole identity source for the woman in every shot.

Preserve her exact face, freckles, eye shape, nose, lips, jawline, skin tone, hairline, center-parted dark brown wavy hair, small gold hoop earrings, outfit, apparent age and body proportions throughout the entire video.

The other images define only their assigned location, composition, lighting, props and camera position. They must not replace, blend with or reinterpret her identity.

Use the exact same woman in all four shots. Keep her hair down with the same length, color, center part and overall shape. Keep the same outfit and earrings.

SHOT 1 | 0.0–3.3 SECONDS | KITCHEN

Use @kitchen_scene only as the kitchen, composition, lighting and prop guide.

The woman records a casual front-camera vlog in a modest apartment kitchen. She raises the off-white ceramic mug slightly, glances toward the morning window and gives a small sleepy smile.

Use natural arm movement, subtle handheld sway, mild front-camera distortion and a small automatic exposure adjustment. Keep her face and the mug stable.

At exactly 3.3 seconds, use an instantaneous hard cut. Do not morph between locations.

SHOT 2 | 3.3–7.0 SECONDS | NEIGHBORHOOD STREET

Use @street_scene only as the street and composition guide.

The exact same woman walks slowly while holding the phone at arm's length. She glances briefly toward the neighborhood and then back at the lens. Keep the movement casual and slightly imperfect, like real consumer smartphone footage.

Her hairstyle, hairline, outfit, earrings, face and body proportions remain identical to Shot 1.

At exactly 7.0 seconds, use an instantaneous hard cut.

SHOT 3 | 7.0–11.0 SECONDS | CAFE

Use @cafe_scene only as the cafe, composition and prop guide.

The exact same woman sits at the wooden cafe table. The phone is stationary across from her. She takes one small sip of iced coffee, places the glass down and looks naturally toward the open unbranded laptop.

Keep her face, freckles, hairline, hairstyle, outfit and body proportions identical to the first two shots. Keep her hands, glass and laptop stable. Include only subtle cafe activity in the background.

At exactly 11.0 seconds, use an instantaneous hard cut.

SHOT 4 | 11.0–15.0 SECONDS | ROOFTOP SUNSET

Use @rooftop_scene only as the rooftop, skyline, composition and lighting guide.

The exact same woman records an arm's-length front-camera selfie on a modest apartment rooftop. A light breeze moves only a few loose strands without changing her hair length, color, center part or overall style.

She looks briefly toward the skyline, returns her eyes to the lens and gives a small genuine smile. End with natural movement rather than a posed freeze frame.

AUDIO

Generate only soft, natural location ambience appropriate to each shot:


- quiet kitchen room tone and a subtle ceramic cup sound

- subdued street ambience and soft footsteps

- low cafe ambience and a soft glass sound

- gentle rooftop wind and distant city ambience

Do not add dialogue, narration, music, lyrics or subtitles in this first version.

VISUAL STYLE

Authentic consumer smartphone footage with natural skin pores, fine facial detail, mild front-camera wide-angle distortion, slight autofocus breathing, subtle exposure changes, realistic motion blur, small handheld imperfections, ordinary natural lighting and slightly imperfect personal-vlog framing.

The result should feel like one real woman casually recorded four moments from the same day.

Avoid cinematic camera movement, glossy advertising light, dramatic depth of field, heavy color grading, excessive sharpness, beauty filters or fashion-campaign posing.

STRICT NEGATIVE RULES

No identity drift.
No different woman between shots.
No face reinterpretation.
No changing eye shape, nose, lips, jawline or freckles.
No hairstyle, hair length, hair color or hairline changes.
No outfit, earrings, age or body-proportion changes.
No duplicated main character.
No morphing or dissolving between locations.
No extra fingers, fused hands or unstable facial features.
No warped mug, glass or laptop.
No text, title card, logo or watermark.
Generate more than one 720p test if the first version misses a cut or changes a prop. Do not rewrite the entire prompt after every result. Change one variable at a time: simplify an action, strengthen one identity rule, or replace one mismatched keyframe. Otherwise, you will not know which change helped.
Step 6: Add Voice-Over and Subtitles Without CapCut or Premiere
Once the visual sequence works, upload the raw video back to Seedance 2.0. This second pass should edit only the audio and text layers. It should not regenerate the woman, replace shots, change the framing, or create lip sync.
This separation matters. Asking one generation to solve five reference images, four scenes, four actions, narration, subtitle spelling, ambient sound, and exact timing at once creates too many failure points. The two-pass workflow still avoids manual editing software, but gives the model a narrower task on the second pass.
Replace @Video1 with the real uploaded-video token, then use this prompt:
Edit @Video1 and return one finished 15-second 4:3 video.

EDITING PRIORITY

Preserve the original video visuals frame by frame.

Do not regenerate, replace or reinterpret the woman, her face, hairstyle, outfit, body, actions, props, locations, lighting or camera movement.

Keep the original four scenes, original shot order, original framing, original duration, original hard-cut timing and original color unchanged.

Do not crop, zoom, stabilize, retime, interpolate or restyle the footage.

Modify only:


1. Add one off-screen female voice-over.

2. Add synchronized burned-in English subtitles.

3. Retain the original natural ambient sound at a lower volume.

VOICE-OVER

Use one consistent young adult American female voice.

The voice should sound warm, relaxed and conversational, like a woman casually narrating her own daily vlog recorded on a smartphone.

It must not sound like an advertisement, news presenter, audiobook narrator or synthetic assistant.

This is off-screen narration. The woman in the video is not speaking.

Do not change her mouth movements and do not create lip sync.

Speak these exact words, without adding, removing, repeating or changing anything:

“A slow morning at home, a walk through the neighborhood, coffee and a little work, then sunset above the city.”

VOICE-OVER TIMING

0.4–3.3 seconds:
“A slow morning at home.”

3.3–7.0 seconds:
“A walk through the neighborhood.”

7.0–11.0 seconds:
“Coffee and a little work.”

11.0–14.7 seconds:
“Then sunset above the city.”

Use natural pacing with a short pause at every visual cut.

Finish the final word before 14.7 seconds.

SUBTITLES

Add burned-in English subtitles containing exactly the same four phrases:

0.4–3.3 seconds:
“A slow morning at home”

3.3–7.0 seconds:
“A walk through the neighborhood”

7.0–11.0 seconds:
“Coffee and a little work”

11.0–14.7 seconds:
“Then sunset above the city”

Subtitle style:


- clean white sans-serif font

- one line at a time

- medium-small size

- horizontally centered

- positioned consistently in the lower safe area

- approximately 8% above the bottom edge

- subtle dark drop shadow for readability

- no background box

- no typewriter effect

- no animated entrance or exit

- no punctuation displayed

- no words placed over the woman's face

- every subtitle must match the spoken narration exactly

AUDIO MIX

Keep the original location ambience quietly audible beneath the narration.

Lower the original ambient sound to approximately 20–25% volume whenever the voice-over is speaking.

Do not add dialogue from the woman.

Do not add another voice, sound effects, lyrics or background music.

STRICT RESTRICTIONS

No visual changes.
No identity changes.
No facial regeneration.
No hairstyle or outfit changes.
No mouth or lip-sync changes.
No new shots or deleted shots.
No transition effects.
No altered playback speed.
No subtitle spelling errors.
No duplicated or overlapping subtitles.
No additional text, title card, logo or watermark.
No extra narration before or after the specified script.
Seedance 2.0's official materials describe joint audio-video generation and controlled video editing. In our test, the second-pass prompt produced the complete voice-over and four burned-in subtitle phrases without assembling clips on a timeline.
Check every subtitle before publishing. Generated text can still be misspelled, duplicated, or placed incorrectly even when the prompt contains the exact wording. “No external editor required” does not mean “no review required.”
Before and After: Raw AI Vlog vs. Finished Video
Version 1: Multi-Shot Video with Ambient Sound
The raw version already contained the kitchen, street, cafe, and rooftop shots in the correct order. It had location ambience but no narration or burned-in subtitles.
Version 2: Voice-Over and Subtitles Added in Seedance 2.0
For the finished version, I uploaded the raw clip and told Seedance to preserve the visuals while adding one off-screen voice, four timed subtitle phrases, and a lower ambient-audio mix.
The visible edit is simple. The workflow is the point: I did not manually cut four clips, record a voice track, align captions on a timeline, or export the project from a separate editor.
| Task |
Manual Timeline Workflow |
This Seedance Workflow |
| Arrange four scenes |
Place and trim clips manually |
Defined by timestamps in the first prompt |
| Add transitions |
Add cuts on a timeline |
Hard cuts requested in the prompt |
| Record voice-over |
Record or import a separate track |
Generated in the second pass |
| Add subtitles |
Type, time, and position captions |
Burned in from the timed script |
| Mix ambience |
Adjust audio tracks manually |
Lowered beneath narration by instruction |
The tradeoff is control. A timeline editor lets you adjust one subtitle by a few frames without touching anything else. Generative editing is faster when it works, but a spelling or timing error may require another generation.
How to Improve Character Consistency Across Scenes
Multi-scene AI video asks the model to reconcile different lighting, camera angles, poses, and backgrounds. Small changes in facial details or hair can still appear between cuts. These steps reduce that variation:
Use one identity master. Do not upload several portraits that merely look similar.
Keep the scene images consistent before video generation. If the stills show different faces, the video model receives conflicting instructions.
Lock visible identifiers. Repeat the same freckles, hairline, center part, earrings, outfit, and apparent age.
Assign scene references a limited role. State that they control only location, composition, lighting, and props.
Use real @ material references. Plain filenames and invented labels do not create a binding.
Keep one simple action per shot. Complex hand movement and rapid camera motion consume attention that could otherwise preserve the subject.
Shorten the structure if needed. Three five-second shots are easier to keep consistent than four fast location changes.
Generate two or three versions from the same stable setup. Choose the strongest output instead of rewriting everything after one attempt.
The most important fix happens before video generation: make the keyframes agree. Repeating “no identity drift” ten times cannot fully repair four different-looking source faces.
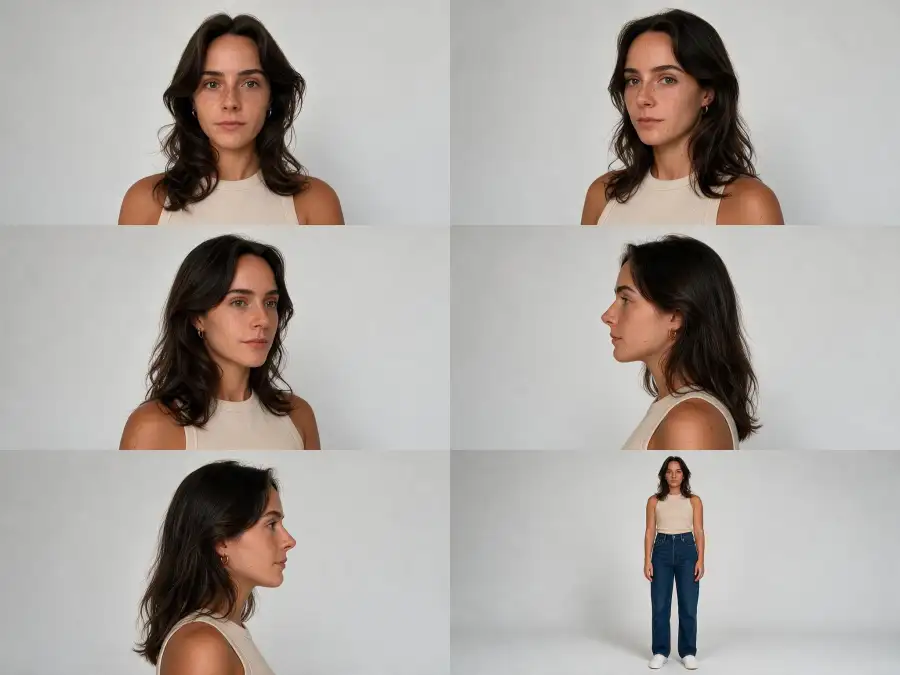
Advanced Option: Build a Character Asset Library
A character asset library can produce more stable results than relying on one portrait alone, especially when the same AI person appears across several videos, camera angles, expressions, or body poses.
Three views—a front portrait, one three-quarter view, and one full-body image—can be enough for a short vlog with limited camera movement. For a recurring character, I recommend a six-view starter library:
| View |
What It Helps With |
| Front-facing portrait |
Direct-to-camera and selfie shots |
| Left three-quarter view |
Natural head turns and over-the-shoulder framing |
| Right three-quarter view |
Matching shots from the opposite side |
| Left side profile |
Walking and side-facing actions |
| Right side profile |
Reverse-angle profile shots |
| Front-facing full body |
Height, build, outfit, and body proportions |
You can start this reference sheet in GPT Proto Canvas by adding the identity master as the reference image and pasting the following prompt:
Use @IdentityMaster as the sole canonical identity reference.

Create one clean 4:3 six-view character reference sheet of the exact same adult woman. Arrange the sheet as a simple 3-by-2 grid with six separate panels in this exact order:


1. front-facing waist-up portrait

2. left three-quarter waist-up portrait

3. right three-quarter waist-up portrait

4. left side-profile waist-up portrait

5. right side-profile waist-up portrait

6. front-facing full-body reference in a relaxed neutral stance

Every panel must show the same person. Preserve her exact facial identity, apparent age, face shape, eye shape and color, eyebrows, nose, lips, jawline, skin tone, freckles, hairline, center part, dark brown wavy hair, body proportions, small gold hoop earrings, and standard outfit.

Use the same neutral expression, natural makeup, soft even studio lighting, plain light-gray background, realistic skin texture, and camera color treatment throughout the sheet. Keep the head size and framing consistent across the five waist-up panels. Show the complete body from head to shoes in the full-body panel.

Do not beautify, redesign, age, or stylize the character. Do not change her face, hairstyle, hair length, hair color, outfit, accessories, body shape, or proportions between panels. No dramatic poses, hand gestures, props, scenery, text, labels, logos, watermarks, duplicated features, cropped head, cropped feet, or six different people.
Treat the first result as a draft, not an approved library. Compare the face, hairline, freckles, body proportions, clothing, and accessories across all six panels. Remove or regenerate any view that looks like a different person. If the model struggles to keep all six views consistent in one sheet, generate two three-view sheets from the same identity master and review them together.
When building a scene keyframe, use the identity master plus only the approved angle or pose reference relevant to that shot. Do not attach the entire library to every prompt; too many near-duplicate references can create new conflicts.
This approach is more cumbersome because you must generate, review, organize, and correctly bind several assets before making the video. It is usually worthwhile for a recurring TikTok persona, YouTube series, virtual influencer, or branded character. For a single 15-second experiment, one strong identity master and carefully matched scene keyframes are usually the faster starting point.
If you want a separate tutorial on generating, checking, and organizing character assets in batches, contact us. We will prioritize a step-by-step batch workflow guide.
How to Save Money on AI Vlog Generations
In the generation screen used for this test, a 15-second 1080p attempt cost about $6, while a 720p attempt cost about $2.50. That made 720p approximately 58% cheaper per test.
These are the displayed prices from this workflow, not a permanent universal price. Check the current amount shown before you generate.
| Number of Attempts |
720p Cost |
1080p Cost |
Savings |
| 1 |
$2.50 |
$6.00 |
$3.50 |
| 2 |
$5.00 |
$12.00 |
$7.00 |
| 3 |
$7.50 |
$18.00 |
$10.50 |
My recommended sequence is simple:
Generate the first two or three versions at 720p.
Check the character, shot order, hard cuts, hands, props, subtitles, and audio.
Fix one problem at a time.
Generate at 1080p only after the structure works.
For a short video viewed primarily on a phone, 720p may already be enough. Choose 1080p when you want a sharper final upload, plan to reuse the footage on larger displays, or need more room for a later crop.
Money-saving tip: Identity consistency, subtitle spelling, and shot order are already visible at 720p. Do not spend $6 testing every small prompt change at 1080p.
How to Adapt the Workflow for TikTok and YouTube
The same prompts can create an AI vlog for TikTok, YouTube Shorts, or a standard YouTube video. Change the canvas and shot framing before generating the identity and scene images.
| Destination |
Recommended Canvas |
Framing Note |
| TikTok |
9:16 |
Keep the face and subtitles inside the center safe area |
| YouTube Shorts |
9:16 |
Leave room for interface elements near the edges and bottom |
| Standard YouTube video |
16:9 |
Use wider environmental compositions |
| Blog example or embedded demo |
4:3 |
Useful when the source images already use 4:3 |
Keep the narration short enough to finish before the final frame. Use one subtitle phrase at a time, and keep it above the platform's lower interface area.
Also disclose that the vlog is AI-generated. TikTok provides an AI-generated content label for realistic AI images, audio, and video; see its official AI-generated content guidance. YouTube requires disclosure when realistic AI content depicts a scene that did not actually occur, and creators can mark this during upload in YouTube Studio. See YouTube's GenAI disclosure rules.
Do not use this workflow to impersonate a real person or imply that a fictional event actually happened. Build the character from synthetic or properly licensed material, and label the finished content clearly.
Can You Use the Same Workflow with Seedance 2.5?
Yes. The reference-library method—one identity source, scene-specific keyframes, timestamped shots, and a separate finishing pass—also applies to newer multimodal video models.
Seedance 2.5 raises the official single-generation limit to 30 seconds and accepts up to 30 images, 10 video clips, and 10 audio clips. It also adds more precise timestamp-based editing. However, ByteDance's July 31, 2026 announcement says API access is still coming soon through BytePlus ModelArk. It should not be presented as an available GPT Proto endpoint until the model is actually live. See the official Seedance 2.5 announcement.
For the workflow demonstrated here, Seedance 2.0 remains the available GPT Proto route.
Final Checklist Before You Publish
The same identity, hair, outfit, and accessories appear in every shot
All scenes appear in the intended order
Hard cuts happen near the requested timestamps
Hands, mug, glass, and laptop remain stable
The voice-over uses the exact script
Every subtitle is spelled correctly and appears once
Subtitles stay inside the safe area and do not cover the face
Ambient sound remains below the narration
There is no extra logo, title card, dialogue, or watermark
The upload is labeled as AI-generated when required
If one visual detail is wrong, return to the raw-video prompt or the relevant keyframe. If only the voice, subtitle, or audio mix is wrong, repeat the second pass without regenerating the original visuals.
Create Your Own Finished AI Vlog
Start with the character, not the video. Build one identity master and four matching keyframes in the GPT Proto AI Image Gallery, then turn them into a multi-shot clip with Seedance 2.0. You can also browse the GPT Proto AI Video Gallery to compare video styles and plan your next scene.
One identity. Four moments. Voice-over, subtitles, and ambient sound. No CapCut or Premiere timeline required.