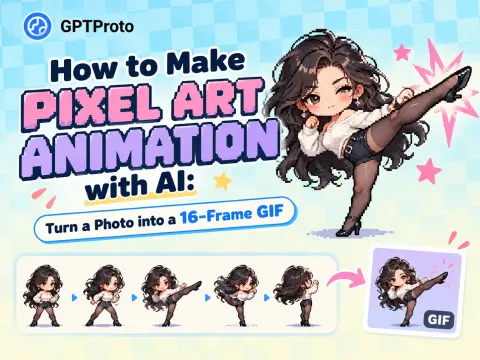
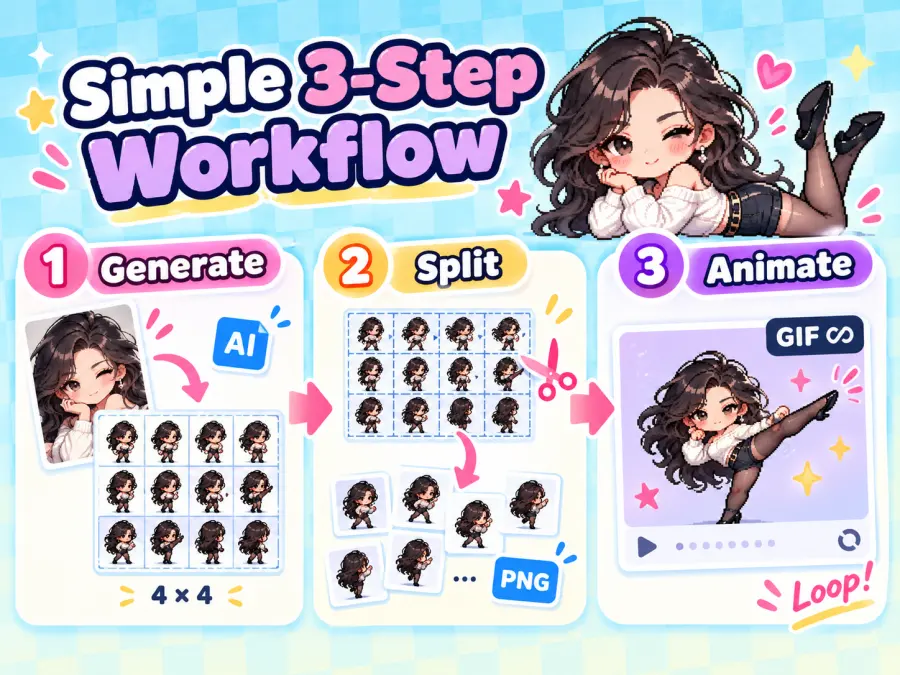
The Simple 3-Step AI Pixel Art GIF Workflow
You only need three main steps:
| Step |
What You Use |
What You Get |
| 1 |
An AI image generator with image-to-image support |
One 4 × 4, 16-frame sprite sheet |
| 2 |
A sprite sheet cutter or image-processing Agent |
Sixteen separate PNG frames |
| 3 |
A GIF maker or image-processing Agent |
One correctly timed, infinitely looping GIF |
The distinction matters: a standard AI image generator can create the artwork, but it may not be able to cut the image, assemble a GIF, package a ZIP, or provide working download links. Those tasks require an additional tool or an Agent with file-processing capabilities.
What You Need Before You Start
Prepare the following:
One clear character reference image
An AI image generator that accepts image uploads
A tool for cutting sprite sheets
A tool for combining PNG frames into a GIF
Optional: an AI Agent that can execute image-processing code
You can start with the GPT Proto AI Image Generator for reference-image generation. GPT Proto also has an AI Character Sheet Generator designed for creating multiple consistent views or poses of one character.
Choose a Reference Image the Model Can Read Clearly
Use a photo in which the subject is clearly separated from the background. The face, hair, clothing, arms, and legs should be easy to identify. A full-body or nearly full-body photo is usually more useful than a tightly cropped portrait when the final animation includes kicks or turns.
Try to avoid:
Multiple people in the same photo
Hands or legs hidden behind large objects
Heavy motion blur
Clothing that blends into the background
Extreme camera angles that hide body proportions
The cleaner the reference, the fewer details the image model has to invent across the 16 frames.
Step 1: Generate a 4 × 4 AI Pixel Art Sprite Sheet
Upload the reference image to your image model. Treat it as the only character reference, then describe both the character identity and the required movement.
Do not ask a standard image model to generate a GIF, ZIP, and 16 downloadable files in the same request. At this stage, the required output is only one sprite sheet PNG.
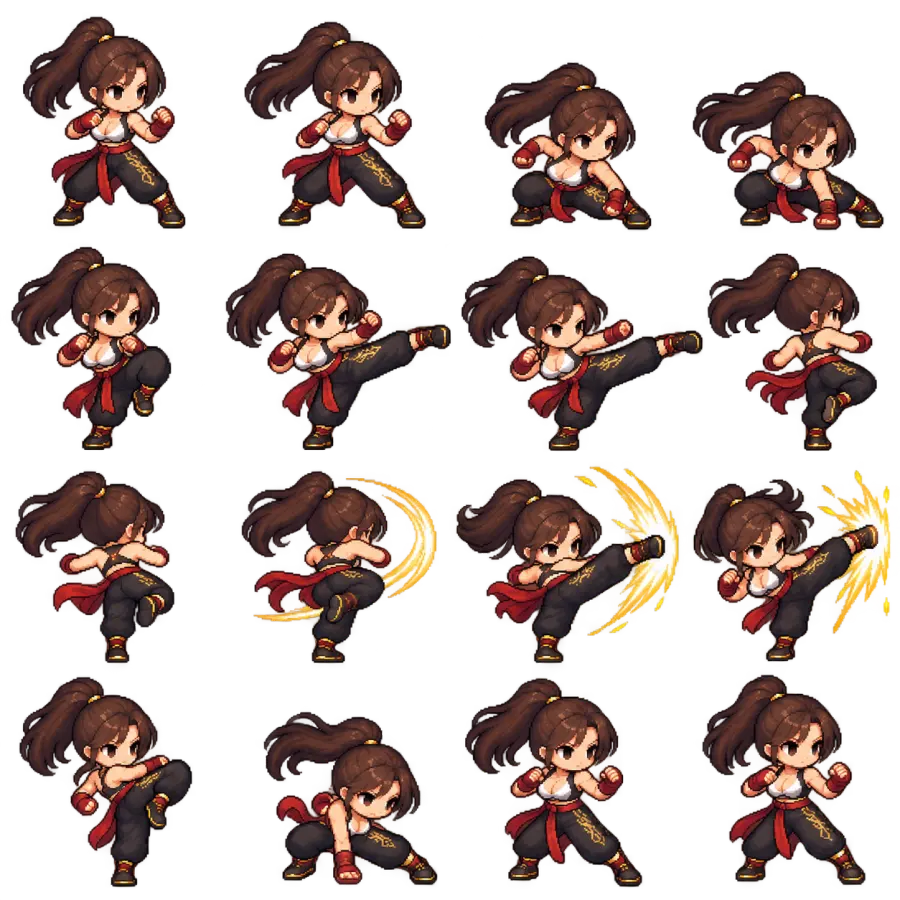
Copy This 16-Frame Sprite Sheet Prompt
The prompt below follows the combat action used in the viral example. You can replace the kick sequence with running, dancing, waving, jumping, or another motion while keeping the layout rules.
Use the uploaded image as the sole character reference.

Create one 1024 × 1024 sprite sheet containing a 16-frame 2.5D chibi pixel art combat animation. Preserve the adult character's recognizable facial features, hairstyle, hair color, clothing, shoes, body proportions, and accessories in every frame. Do not redesign or simplify the outfit between frames.

Arrange the animation as 4 columns × 4 rows, read from left to right and then top to bottom. Each cell represents one 256 × 256 frame and contains one complete character.

Action sequence:
Frames 1–2: ready stance and preparation.
Frames 3–4: lower the center of gravity and charge the movement.
Frames 5–7: execute a hip-driven side kick with clear changes in the supporting leg, torso angle, and balance.
Frames 8–10: retract, turn, and perform a spinning kick. Show real body rotation rather than rotating a static drawing.
Frames 11–12: reach the impact peak, with a small amount of physical pixel impact effects and a brief held pose.
Frames 13–14: retract the leg and land with visible weight transfer.
Frames 15–16: recover smoothly toward the opening stance so the animation can loop.

Show believable center-of-gravity shifts, joint movement, hip-driven force, hair inertia, and slight clothing follow-through. Do not fake animation by merely translating, scaling, or rotating the same static character.

Art style: crisp 16-bit arcade pixel art, Q-version/chibi proportions with a slight stereoscopic sense, clean outlines, sharp square pixels, limited unified color palette, and readable silhouettes. No blur, painterly texture, photorealism, 3D rendering, or anti-aliased edges.

Layout requirements: fixed camera, identical character scale, stable ground baseline, consistent lighting, and transparent margins inside every cell. The body, hair, shadows, and effects must not cross cell boundaries. Use a truly transparent background.

Do not add weapons, magic, extra characters, text, labels, borders, grids, checkerboard patterns, scenery, or watermarks.

Output only the complete 4 × 4 sprite sheet as a transparent PNG.
For better identity consistency, add a one-line description of the visible character underneath the first paragraph. For example:
Character details: long dark curly hair, white off-shoulder knit sweater, black high-waisted shorts, black stockings, pointed black heels, silver earrings, and a thin necklace.
Even when these details are visible in the reference image, writing them down gives the model a fixed checklist for all 16 frames.
Recommended 16-Frame Action Distribution
The frames do not need to give every movement the same amount of space. Preparation and impact need readable poses, while the kick itself should move faster.
| Frames |
Action |
What Should Visibly Change |
| 1–2 |
Prepare |
Stance, hands, breathing, initial balance |
| 3–4 |
Charge |
Bent supporting leg, lowered hips, torso tension |
| 5–7 |
Side kick |
Hip opening, leg extension, counterbalance |
| 8–10 |
Turn and spinning kick |
Foot pivot, shoulder turn, hair follow-through |
| 11–12 |
Impact peak |
Full extension, brief hold, small pixel impact effect |
| 13–14 |
Retract and land |
Leg recovery, contact with ground, weight transfer |
| 15–16 |
Recover |
Return toward the opening silhouette |
This is a recommended distribution for this example, not a universal animation standard. A blink may need only a few frames, while a complex dance may need more than 16.
Check the Sprite Sheet Before Cutting It
Zoom in and inspect all 16 cells. Do not continue if the sheet already has major structural problems.
Check that:
There are exactly 16 distinct frames
The order reads from left to right and top to bottom
The character keeps the same face, hair, clothing, and proportions
The feet stay close to a stable ground line
Every frame contains one complete character
No limbs, hair, or effects enter a neighboring cell
The background is transparent rather than a painted checkerboard
The final pose can return naturally to the first pose
If only one or two frames are wrong, regenerate those poses separately and replace the bad cells. If the entire character changes repeatedly, revise the prompt and regenerate the full sheet before moving on.
Step 2: Split the Sprite Sheet into 16 PNG Frames
Once the sprite sheet is correct, divide it into 16 equal images. A 1024 × 1024 sheet arranged in four columns and four rows produces 256 × 256 cells.
Split the Sheet Without Coding
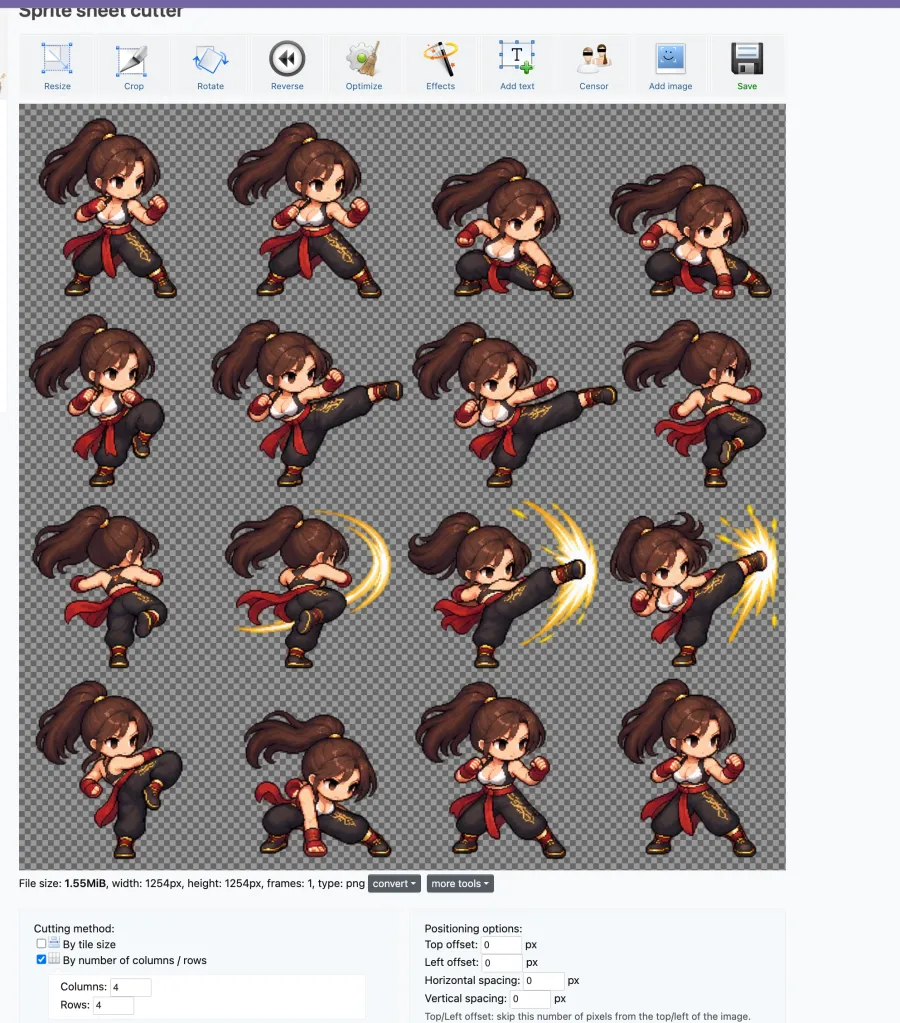
The Ezgif Sprite Sheet Cutter can slice an image by tile size or by its number of rows and columns.
Upload the 1024 × 1024 sprite sheet.
Choose the option to split by rows and columns.
Enter four columns and four rows.
Confirm that the preview contains 16 images.
Download the individual frames together as a ZIP.
After downloading, rename the files in playback order:
frame-01.png
frame-02.png
frame-03.png
...
frame-16.png
The leading zero is important. Some tools sort filenames alphabetically, which can place frame-10.png immediately after frame-1.png and before frame-2.png. Zero-padded names preserve the intended order.
Ask an Agent to Cut the Sprite Sheet
If your Agent can run image-processing code, attach the sprite sheet and use this shorter instruction:
Split the attached 4 × 4 sprite sheet into 16 equally sized PNG images. Read the cells from left to right and top to bottom. Preserve the original pixel dimensions, sharp pixel edges, and transparency. Name the files frame-01.png through frame-16.png, verify that every output image is the same size, and package all 16 files into a ZIP. Return the actual PNG and ZIP files, not only code or instructions.
Open a few of the resulting files before proceeding. Each frame should have the same canvas size, the subject should remain aligned, and no part of a neighboring frame should appear along the edges.
Step 3: Turn the 16 Frames into a Looping GIF
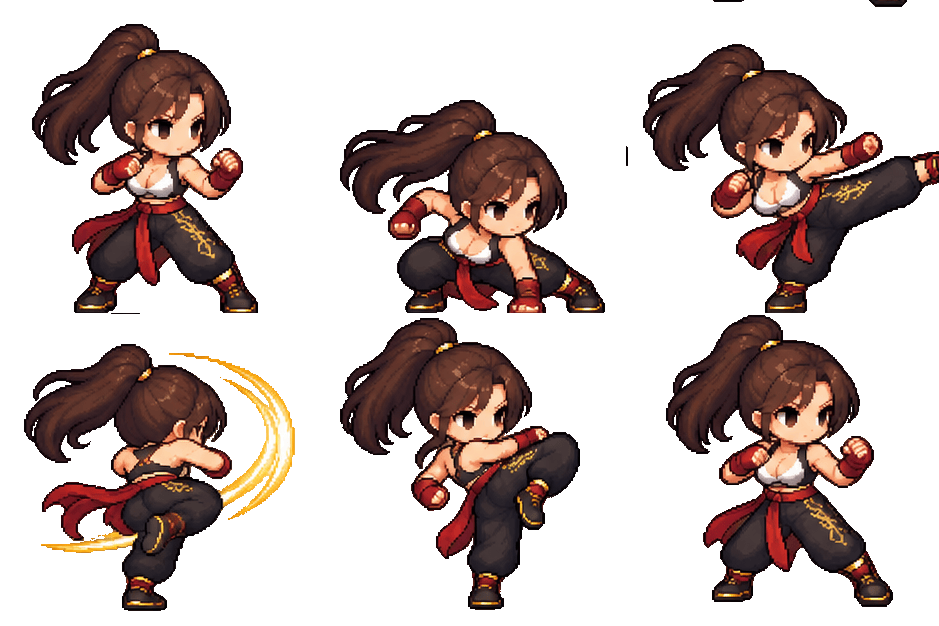
Upload the PNG files to a GIF maker such as Ezgif GIF Maker. It sorts uploaded files alphabetically by default, although you can also drag frames into a different order.
Before generating the GIF, confirm that the preview starts at frame-01.png and ends at frame-16.png. If the character appears to teleport, kick backward, or skip the impact pose, check the file order before changing the artwork.
Use Variable Timing for a More Natural Action
Giving every frame the same delay often makes a combat animation feel mechanical. Use slower timing for anticipation and recovery, faster timing through the strike, and a short pause at impact.
This timing pattern produces a 1.72-second loop:
| Frames |
Action |
Delay per Frame |
| 1–2 |
Prepare |
140 ms, 120 ms |
| 3–4 |
Charge |
150 ms, 130 ms |
| 5–7 |
Side kick |
90 ms, 70 ms, 60 ms |
| 8–10 |
Spinning kick |
70 ms, 60 ms, 70 ms |
| 11–12 |
Impact and release |
160 ms, 120 ms |
| 13–14 |
Land |
100 ms, 110 ms |
| 15–16 |
Recover |
130 ms, 140 ms |
The GIF format records delay in hundredths of a second, according to the GIF89a specification. If the tool asks for hundredths rather than milliseconds, enter:
14, 12, 15, 13, 9, 7, 6, 7, 6, 7, 16, 12, 10, 11, 13, 14
Set the loop count to infinite. In tools based on Pillow, loop=0 represents an infinite loop, and duration can be supplied as a separate value for each frame, as documented in the Pillow GIF guide.
Export and Test the GIF
Download the GIF and open it in both a browser and an image viewer. Watch several loops rather than only the first playback.
Check for:
A natural transition from frame 16 back to frame 1
No leftover pixels from the previous frame
No sudden movement of the ground baseline
A visible but brief impact pause
Correct transparent background
Acceptable file size and playback speed
GIF uses a palette-based transparent color rather than the full RGBA transparency available in PNG. Soft semi-transparent shadows and edges can therefore become harder or more visibly dithered in the GIF. Keep the original sprite sheet and separate PNG frames as the higher-quality source files.
How to Make AI Pixel Art Animation More Consistent
The most difficult part of AI pixel animation is not producing 16 pictures. It is making all 16 pictures look like the same character performing one continuous action.
Community discussions about AI-generated sprites repeatedly report changing colors, drifting character details, broken frame flow, and limbs extending beyond the frame. These are useful warnings, although they reflect user experience rather than a formal benchmark.
The following prompt decisions help reduce those problems:
Use one identity reference. Tell the model that the uploaded image is the sole character reference. Multiple references can introduce conflicting faces, outfits, or proportions.
Repeat the defining details. List the hairstyle, top, lower-body clothing, shoes, and visible accessories. The model should not have to rediscover them in every cell.
Describe the mechanics of the movement. Instead of only saying “perform a kick,” mention the supporting foot, hip rotation, center-of-gravity shift, torso counterbalance, and landing.
Lock the camera and ground line. A fixed viewpoint makes the frames easier to align. A stable baseline prevents the character from appearing to bounce without a reason.
Account for secondary motion. Hair and loose clothing should react slightly after the torso changes direction. That delay helps the movement feel connected rather than assembled from unrelated poses.
Keep effects small. A few impact pixels can strengthen the hit. Large smoke clouds or glowing effects make the character harder to read and are more likely to cross cell boundaries.
Design the final frame for the loop. Frame 16 does not have to duplicate frame 1, but its posture should lead naturally back to the opening stance.
Common Problems and How to Fix Them
| Problem |
Likely Cause |
Practical Fix |
| The face or outfit changes between frames |
The identity description is too loose |
Repeat the fixed character details and remove optional costume variations |
| The action looks like a sliding sticker |
The model translated or rotated a static pose |
Require visible joint movement, foot pivots, hip rotation, and weight transfer |
| The frames play in the wrong order |
Filenames were sorted alphabetically |
Rename them frame-01.png through frame-16.png |
| Hair or feet are cut off |
The pose extends beyond its cell |
Request more transparent margin and require every body part to stay inside the cell |
| A checkerboard appears in the exported image |
The model painted a transparency pattern |
Regenerate with “true transparent background” or remove the background before making the GIF |
| Old pixels remain behind the moving character |
The previous GIF frame is not being cleared correctly |
Change the disposal behavior so the canvas is cleared before the next frame |
| The loop jumps after frame 16 |
The recovery ends in a different stance |
Add one or two transition frames that return toward the opening pose |
| The pixel art looks blurry |
The sheet was resized with smoothing |
Keep the native dimensions or use integer scaling with nearest-neighbor interpolation |
| The GIF loses soft shadows |
GIF cannot preserve full RGBA transparency |
Keep shadows pixel-based or publish PNG/APNG/WebP alongside the GIF |
For GIF ghosting, the disposal setting controls what happens to the previous frame before the next one is displayed. The GIF89a specification defines options including leaving the frame in place, restoring the background, and restoring the previous image. When a tool exposes this setting, clearing the previous frame is generally the safer choice for a moving character on a transparent canvas.
Faster Method: Let an AI Agent Create All the Files
The three-step method works with an ordinary image generator and free file-processing tools. There is a faster option if you have an AI Agent that can do all four of the following:
Generate or edit images from a reference
Execute image-processing code
Create GIF and ZIP files
Return real downloadable files
Attach the character image and paste the prompt below.
You are an image-generation and file-processing Agent. Use the uploaded image as the sole character reference.

Create a 16-frame 2.5D Q-version pixel combat animation. Retain the adult character's recognizable face, hairstyle, hair color, clothing, shoes, body proportions, and accessories throughout. For this character, preserve: [insert the visible character details here].

Actions:
Prepare → Charge → Side Kick → Turn and Spinning Kick → Impact Peak → Retract Leg and Land → Recover.

The movement must show hip-driven power, center-of-gravity shifts, supporting-foot pivots, joint changes, torso counterbalance, hair inertia, and slight clothing follow-through. Add only a small amount of physical impact pixel effects. Do not add weapons or magic. Do not fake movement by merely translating, scaling, or rotating a static character.

Art style:
16-bit arcade pixel art, crisp square pixels, clear outlines, limited unified palette, Q-version/chibi proportions, slight stereoscopic depth, and readable silhouettes. No blur, anti-aliasing, painterly texture, photorealistic rendering, or smooth 3D rendering.

Sprite sheet specifications:

- 4 columns × 4 rows, 16 frames in total

- Read left to right, then top to bottom

- Each frame is exactly 256 × 256 pixels

- Complete sheet is exactly 1024 × 1024 pixels

- Fixed camera and consistent character scale

- Stable ground baseline

- One complete character per cell

- Body, hair, shadows, and effects must not cross cell boundaries

- Transparent margin around the character in every cell

- True transparent background, not a checkerboard pattern

- No text, labels, borders, grids, scenery, or watermarks

File-processing tasks:

1. Generate the complete sprite sheet as a transparent RGBA PNG.

2. Verify that it is 1024 × 1024 and contains exactly 16 correctly ordered cells.

3. Split it into 16 separate 256 × 256 transparent PNG files.

4. Name the files frame-01.png through frame-16.png in playback order.

5. Create an infinitely looping transparent GIF using these frame durations in milliseconds:
   [140, 120, 150, 130, 90, 70, 60, 70, 60, 70, 160, 120, 100, 110, 130, 140]

6. Clear the previous frame correctly to prevent ghosting.

7. Package all 16 individual PNG frames into one ZIP file.

Before delivery, check:

- Frame count and dimensions

- Real background transparency

- Character identity and outfit consistency

- Correct frame order

- Cropping and cell-boundary violations

- Stable alignment and ground baseline

- GIF playback, disposal behavior, and infinite loop

- Natural connection between frames 16 and 1

If any check fails, repair the affected frame or file and repeat the validation. Do not claim that a file has been created unless it actually exists.

Deliver these actual files with working download links:

- Transparent RGBA sprite sheet PNG

- Transparent looping GIF

- ZIP containing the 16 transparent PNG frames
If the assistant responds only with instructions, code, or a still image, it probably does not have all the required Agent capabilities. Use the manual three-step workflow instead of repeatedly asking a standard image model to manufacture file links it cannot create.
Create Your Own 16-Frame AI Pixel Art GIF
The easiest way to make AI pixel art animation from a photo is to separate the creative and technical tasks. Let the image model design the 16-frame action sequence, then let dedicated tools handle accurate cutting, frame timing, transparency, and looping.
Start with a clear reference image, keep the character constraints specific, and reject a broken sprite sheet before turning it into a GIF. That small quality check saves far more time than trying to repair 16 badly aligned frames after export.
Ready to create the first sheet? Try the GPT Proto AI Character Sheet Generator and turn one character reference into a reusable set of consistent action frames.