TL;DR:
「小さなロブスター」の愛称で知られるOpenClawは、あなたのコンピューター上で動作するオープンソースのAIエージェントです。—10年前のコンピューターでも動作します—API経由でほぼすべてのAIモデルに接続でき、ファイル操作、メール送信、ウェブ閲覧、タスクの自動化などを、QQやFeishuのようなシンプルなチャットアプリから実行できます。
OpenClawとは何か、どう使うのか知りたいですか?初心者向けのこのOpenClawガイドでは、セットアップ、モデルの選び方、デバイス要件、実際の活用例を解説し、すぐに使い始められるようサポートします。
「小さなロブスター」の愛称で知られるOpenClawは、あなたのコンピューター上で動作するオープンソースのAIエージェントです。—10年前のコンピューターでも動作します—API経由でほぼすべてのAIモデルに接続でき、ファイル操作、メール送信、ウェブ閲覧、タスクの自動化などを、QQやFeishuのようなシンプルなチャットアプリから実行できます。
OpenClaw is one of the fastest-growing open-source AI projects of 2025. Originally released in late November 2024 under a different name, it went viral after the Lunar New Year when tens of thousands of people discovered it outpaces even ChatGPT and DeepSeek in active community buzz. Notably, the project's core developer was later hired by OpenAI, which says a lot about the quality of the work. At the same time, AI platforms have been consolidating rapidly, and users who relied on a single provider are now dealing with shifting pricing, new restrictions, and uncertain roadmaps. OpenClaw gives you a way out of that dependency by connecting to almost any AI model you choose.

In this OpenClaw guide, you will learn:
What OpenClaw actually is and how it works
What kind of computer you need to run it
How to choose an AI model that fits your budget
Which chat apps you can connect it to
What tasks OpenClaw can realistically handle for you
How to get a cost-effective API through GPT Proto
The nickname "little lobster" comes from the project's logo, which features a lobster emoji. The actual product is called OpenClaw, and it has gone through a surprising number of name changes in a very short time — Clawdbot, Moltbot, Molty, and a few others. If you come across any of those names in older tutorials, they all refer to the same tool.
OpenClaw launched in November 2025 and started spreading online in January 2026. In its early days it was mostly known within small AI enthusiast communities. What pushed it into the mainstream was the period just after the Lunar New Year, when it took off faster than any comparable tool before it — outpacing even the early buzz around ChatGPT and DeepSeek. One notable detail that speaks to the project's quality: OpenAI hired away the project's founder and lead developer after it became popular.
OpenClaw is not a chatbot. It is a local AI agent that lives on your computer and uses a connected AI model to carry out tasks on your behalf.
If ChatGPT is a smart assistant that talks to you, OpenClaw is more like a smart employee who actually does the work. It can open files, browse the web, write and send emails, process spreadsheets, take screenshots, and run scripts, all triggered by a simple message you send from your phone through an app like Feishu or QQ.
OpenClaw acts as the "hands and legs" of an AI model. It sits on your computer waiting for instructions, and when you send a message through your connected chat app, it picks up that instruction and executes it using both the AI model's reasoning and your computer's local resources.
The system has three parts working together:
The OpenClaw program installed on your computer
An AI model API from a provider like Qwen, Kimi, Zhipu, or others via GPT Proto
A chat app such as Feishu, QQ, DingTalk, or WeCom where you send commands
You can be out running errands while your home computer is quietly organizing files, drafting reports, or researching a topic for you.
Many people wonder how OpenClaw compares to tools they already use. Here is a simple side-by-side look:
| Feature | ChatGPT / DeepSeek | OpenClaw |
| Runs on your computer | No | Yes |
| Can access local files | No | Yes |
| Sends emails for you | No | Yes |
| Works while you are away | No | Yes (if PC is on) |
| Connects to your own AI model | No | Yes |
| Open source | No | Yes |
| Monthly cost | Subscription | API pay-as-you-go |
The core difference is that ChatGPT gives you answers while OpenClaw takes actions.
The good news is that OpenClaw itself is a lightweight program. It does not run a local AI model on your hardware. It simply connects to a remote API, which means almost any machine that can go online will work.
Here are the basics:
Any computer running Windows, macOS, or Linux
Node.js version 22 or higher installed (use the nvm tool if your system is older)
A stable internet connection
An API key from an AI model provider
A 10-year-old MacBook Air with 4 GB of RAM has been tested and confirmed to work fine for personal use. You do not need a high-end machine.
Recommended setup options, from safest to most convenient:
An old or spare computer you set aside just for OpenClaw (safest choice)
A virtual machine using software like VirtualBox or UTM running inside your main computer
Your daily computer, provided you understand the permissions you are granting
One important warning: do not install OpenClaw on a work computer that holds sensitive business data until you are fully comfortable managing its permissions. OpenClaw needs access to your system to do its job, similar to hiring a housekeeper and giving them a key. If you set clear boundaries, it behaves accordingly.
Cloud servers are not recommended for beginners. Without a graphical interface, even simple tasks like taking a screenshot become confusing, and OpenClaw's best use cases involve your personal files and local apps, not a remote server.
Getting OpenClaw running requires just a few steps. The actual installation is a single command.
Open your terminal and run:
curl -fsSL https://openclaw.ai/install.sh | bash
You do not need a new or powerful Mac to run OpenClaw. A 2013 MacBook Air with just 4 GB of RAM has been tested and confirmed to work. If you have an old Mac gathering dust, here is how to bring it back to life as a dedicated OpenClaw machine.
The one hurdle: an outdated operating system. Older Macs cannot officially upgrade past a certain macOS version, which means Node.js and other dependencies simply refuse to install. The fix is a free tool called OpenCore Legacy Patcher (OCLP), which lets you force-install the latest macOS onto hardware Apple no longer supports.
Before you start, do these three things:
Back up all data using Time Machine or an external drive
Make sure you have at least 30 GB of free disk space
Prepare a USB drive of 16 GB or larger (it will be wiped during the process)
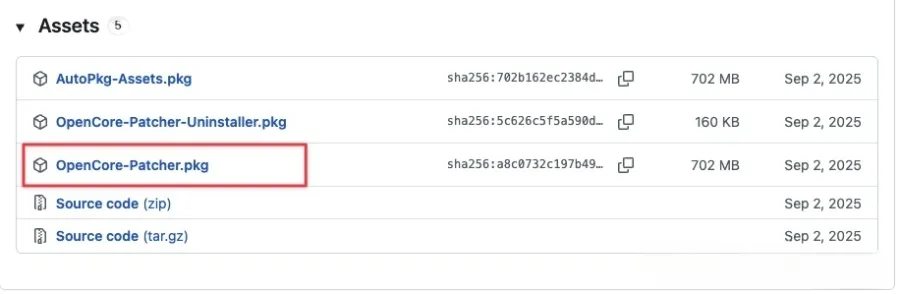
Step 1: Download OpenCore Legacy Patcher
Get the latest release from https://github.com/dortania/OpenCore-Legacy-Patcher/releases and install it. Open the app and select "Build and Install OpenCore" first.
Step 2: Download macOS and write it to your USB drive
Inside OCLP, click "Create macOS Installer," then "Download macOS Installer." Choose the latest version of macOS (Sequoia is recommended for best compatibility). Once the download finishes, click "Install macOS Installer" and select your USB drive.


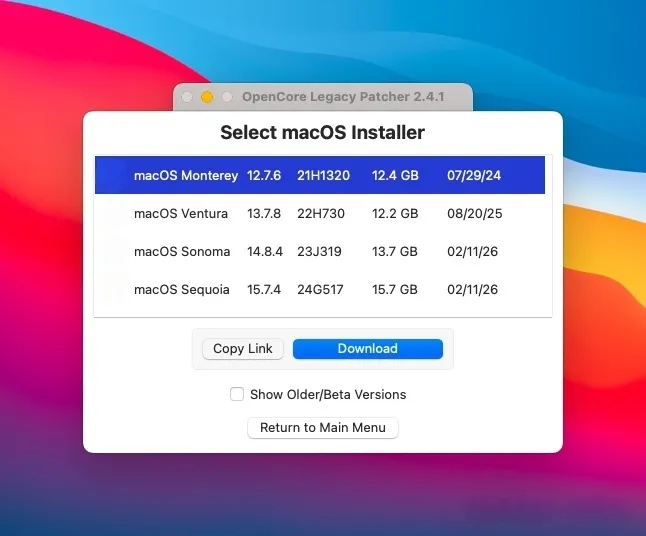
Step 3: Write the OpenCore bootloader to the USB drive
Back in the OCLP main screen, click "Build and Install OpenCore" again, then "Install to disk" and select your USB drive. This writes the boot files that let your old Mac start from the installer.
Step 4: Boot from the USB drive and install macOS
Shut down your Mac. Plug in the USB drive and power on while holding the Option (Alt) key. Select the "EFI Boot" option (it looks like a gear icon), then choose "Install macOS Sequoia." The installer will launch and your Mac will restart several times. This is normal. The full installation takes around 30 to 60 minutes.
Step 5: Apply post-install patches (do not skip this)
After the desktop loads, open OCLP again. It will usually prompt you automatically. Click "Post-Install Root Patch," then "Start Root Patching," and restart. This step installs the correct graphics and network drivers. Without it, your Wi-Fi may not work and the display could feel sluggish.

Step 6: Move the bootloader to your internal drive
Right now your Mac still needs the USB drive to start. Open OCLP one more time, go to "Build and Install OpenCore," click "Install to disk," and this time select your internal hard drive instead of the USB. After this step you can unplug the USB and boot normally.
Squeezing performance out of 4 GB of RAM
Once macOS is running on the old hardware, a few tweaks make a real difference:
Go to Settings > Accessibility > Display and enable both "Reduce Transparency" and "Reduce Motion." These two settings significantly lower the memory load from visual effects.
Remove any widgets from the Notification Center. Each one runs as a background process.
Use Safari instead of Chrome. On macOS, Safari handles memory compression far more efficiently, which matters a lot on a 4 GB machine.
After these adjustments, the experience becomes noticeably more responsive, and OpenClaw itself runs without issues.
Keeping the Mac online and accessible from anywhere
Two practical problems come up when you use an old Mac as an always-on OpenClaw server. First, it will go to sleep and disconnect. Second, your home network probably does not have a public IP address, so you cannot reach it remotely.
To prevent sleep, run this command in Terminal:
caffeinate -dis
This keeps the system, display, and disk active until you press Ctrl+C to cancel.
For remote access, Cloudflare offers a free tunneling tool that creates a public URL pointing to your home machine. First install it with Homebrew:
brew install cloudflared
Then open the tunnel with:
cloudflared tunnel --url http://127.0.0.1:18789 &
The terminal will print a URL like https://something.trycloudflare.com. You can open that URL from any browser, anywhere, to reach your OpenClaw web interface. Note that this URL changes every time you restart the tunnel. For a permanent fixed URL, Cloudflare also supports named tunnels with a free account.
One last step: by default OpenClaw only accepts connections from the local machine. To allow remote access, open http://127.0.0.1:18789 on the Mac itself, go to Settings > Gateway > Control UI, and add your Cloudflare URL to the "Control UI Allowed Origins" field. Save and restart. Then copy the Gateway Token from the overview page. When accessing remotely, append ?token=your_token to the URL. You only need to do this once.
Open PowerShell and run:
iwr -useb https://openclaw.ai/install.ps1 | iex
Windows installations tend to have more errors than macOS. If you get stuck, the most effective approach is to paste your error message into an AI chat tool and ask it to walk you through a fix. The official documentation is available at https://docs.openclaw.ai/ and now includes Chinese language support.
If the command line feels intimidating, there is a smarter way to do this. Instead of manually running commands and troubleshooting errors yourself, you can have an AI desktop assistant handle the entire installation while you watch. This approach works on both Windows and macOS, and the whole process takes about 10 minutes.
Step 1: Get a free AI model API key
OpenClaw needs an AI model to function. Before starting, grab a free API key from OpenRouter using the Step 3.5 Flash model, which is currently one of the most popular choices in the OpenClaw community and costs nothing to use.
1. Visit https://openrouter.ai/stepfun/step-3.5-flash:free
2. Scroll to the middle of the page and click "Create API Key"
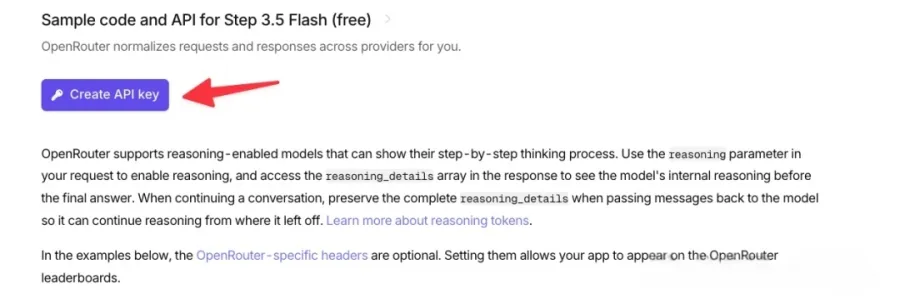
3. Give it any name you like and click Create

4. Copy the key immediately and save it somewhere safe — it is only shown once

Step 2: Set up a QQ bot (takes about 1 minute)
QQ is the simplest chat app to connect to OpenClaw, and it has official support. You will use it to send commands to your OpenClaw agent from your phone or desktop.
Scan the QR code to log in, then click "Create Bot"
Copy the Token shown on the page and keep it ready
Leave this page open, you will need it again shortly
Step 3: Download an AI desktop assistant and let it do the work
Download the StepFun AI Desktop Companion from https://www.stepfun.com/download. It has both Windows and macOS versions. Install it, log in, and you will see a small icon appear on the side of your desktop.
Click the icon and paste the following instruction, filling in your own API key and QQ bot token:
Help me install OpenClaw and configure it with QQ.
Model: openrouter/stepfun/step-3.5-flash:free
API key: (paste your key here)
QQ bot token: (paste your token here)
Once you send that message, the AI takes over. A terminal window will open on its own and you will see commands running automatically. Your only job from this point is to respond when human input is required:
Permission dialogs: If your computer asks you to allow something, click Allow
Missing tools: If Git or another dependency is not installed, the AI will tell you. Click to install it, then tell the AI to continue
Password prompts: For system-level operations the AI cannot type your password. It will ask you to enter it manually
Step 4: Chat with your OpenClaw agent through QQ
Once the installation is done, go back to https://q.qq.com/qqbot/openclaw/login.html and hover over "Scan to Chat." Scan the QR code with your phone's QQ app. Your OpenClaw assistant will now appear as a contact in QQ, and you can start giving it tasks through chat with no further setup required.
After installation, connect your chosen AI model API and link a chat app. From that point on, all interaction happens through chat messages.
OpenClaw is just the agent. The intelligence comes from whichever AI model you connect to it. Choosing the right model affects both the quality of results and what you spend each month.
For most beginners, starting with a Chinese domestic model is the practical choice. They are fast, affordable, and easy to set up. Providers like Qwen (Alibaba), Kimi (Moonshot AI), Zhipu AI, Minimax, and StepFun all offer API access through their official websites.
Pricing is competitive. Many users find that $5 to $15 per month covers typical personal assistant workloads comfortably. Some providers even offer limited free tiers to get started.
If you want access to a wider range of models including GPT, Claude, Gemini, and Grok at significantly reduced rates, GPT Proto is worth considering. It is a unified API platform that aggregates top global AI models under one API key. Instead of signing up separately for each provider and juggling multiple billing accounts, you connect once and switch between models by changing a single parameter. GPT Proto's pricing runs roughly 40 to 80 percent below official provider rates depending on the model, which makes it a practical choice for OpenClaw users who want flexibility without high costs. You can browse all available models at https://gptproto.com/model.
The smarter the model you connect, the more capable your OpenClaw agent becomes. That said, for routine tasks like summarizing documents, managing files, or drafting emails, a mid-tier domestic model performs well and costs very little.
Once OpenClaw is installed and your API is connected, you need a way to send it instructions. OpenClaw integrates with several messaging platforms so you can command it from your phone while away from your computer.
Currently supported platforms include:
Feishu (Lark) — officially supported and the most smoothly integrated option
QQ — easiest for beginners, setup takes about five minutes
WeCom (Enterprise WeChat) — works well but requires a public IP address to configure
DingTalk — supported with a detailed setup process
WeChat personal accounts are not officially supported and attempting to automate them risks account suspension. Most beginners are best served by starting with QQ because the setup is the simplest.
The typical workflow looks like this: OpenClaw runs on your home or office computer, connected to your chosen AI model API. You send a message from your phone through QQ or Feishu, and your computer starts executing the task. By the time you get back to your desk, the work is done.
OpenClaw's real value comes not from a fixed list of features but from how flexibly it can be directed. Here are some practical examples of what real users have set it up to do:
Summarize and organize messy Excel files, then generate a chart and send it back in the chat
Browse dozens of web pages on a research topic and compile a report with source links
Monitor a product listing or a price and send an alert when conditions change
Draft and send emails in response to incoming messages while you are asleep
Search your local documents and return the file you are looking for when you describe it
These are not edge cases. They represent the kind of repetitive, time-consuming tasks that most people deal with every week. OpenClaw is not best described by its feature list. It is best described by whatever your most annoying recurring task is.
Safety is one of the most common concerns for new users, and it deserves a straightforward answer.
OpenClaw is fully open source. Its code is publicly visible and has been reviewed by a large developer community. There are no known backdoors or hidden data collection behaviors. That said, because OpenClaw has real access to your computer, the permissions you grant it matter.
Practical safety guidelines:
Do not install it on a computer with sensitive business or client data until you understand the permissions involved
Shut it down when you are not using it to prevent any background activity
Keep your API key private and do not share it
Use a dedicated or spare machine if you prefer maximum separation
OpenClaw is not dangerous by design, but like any tool with broad computer access, it should be set up thoughtfully.
Once it is installed, daily use requires no coding at all. You interact through a chat app the same way you would message a person. The only technical hurdle is the initial setup, and even that can be handled by pasting errors into an AI tool and asking for help.
OpenClaw itself is free. Your costs come from the AI model API you connect to it. For most personal use cases with a domestic Chinese model, expect to spend between $5 and $15 per month. If you use a premium model like GPT or Claude through a AI API platform like GPT Proto, costs stay manageable thanks to discounted rates, and you can monitor your usage closely on the dashboard.
You cannot install OpenClaw directly on iOS or most Android devices. However, you can control it from your phone by sending messages through a connected app like QQ or Feishu. The agent runs on your computer while you operate it remotely.
Only when you want it to work. If you plan to have it monitor something overnight or execute tasks while you are out, your computer needs to stay on and OpenClaw needs to be running. For on-demand use, you can simply launch it when needed and close it afterward.
The "little lobster" has earned its reputation fast. OpenClaw went from a small AI community favorite to one of the most talked-about tools in the space within just a few months, and the reason is simple: it actually does things rather than just responding to questions. Whether you run it on a brand-new machine or a decade-old MacBook Air with 4 GB of RAM, the core experience is the same — you send a message from your phone, and your computer handles the work.
Getting started is more accessible than most people expect. If the command line feels overwhelming, the AI-assisted installation method covered in this guide removes that barrier entirely. If you have old hardware sitting unused, it can become a dedicated 24/7 little lobster server for zero additional cost. And if you want access to the best AI models without paying full provider prices, GPT Proto AI API Platform offers a unified API covering GPT, Claude, Gemini, and dozens more at significantly reduced rates. Start with a simple task, get comfortable with how OpenClaw responds to instructions, and build from there.

要約: GPT-5.4は、推論、コーディング、デスクトップ操作を1つに統合したOpenAIの最新モデルです。ほとんどのベンチマークでGPT-5.2を上回り、100万トークンのコンテキストウィンドウに対応しています。現在はGPT Protoなどのプラットフォームを通じて、より低いAPI料金で利用できます。
Tiffany Layne | 2026-03-23

はじめに 2026年2月26日、Google DeepMindはひっそりとNano Banana 2をリリースしました — そしてAIコミュニティはすぐにその存在に気づきました。リリースから数時間以内に、Arenaのテキスト画像変換ランキングでGPT-image-1とNano Banana Proの両方を上回り、スコア1,279で首位に立ちました。正式な技術名称は Gemini 3.1 Flash Image (Gemini 3.1 Flash Image Previewとも呼ばれます)。 大規模に高速かつ高品質な画像生成を必要とする開発者、デザイナー、コンテンツ制作者にとって、Nano Banana 2は、しばらく問われ続けてきた疑問に答えを出します。Proレベルの速度制限やコストなしに、Proレベルの画質を得られるのか。答えは、どうやら「はい」です。
Tiffany Layne | 2026-03-05

要約 Seedance 2.0は、ネイティブ音声付きの映画のような映像を生成する、ByteDanceの強力な新しいAI動画モデルです。そのリリースを受け、著作権上の懸念からDisneyをはじめとするハリウッドの映画会社が使用停止要求書を送りました。開発者は現在、GPT Protoなどのプラットフォームを通じて以前のSeedanceバージョンにアクセスでき、Seedance 2.0 APIへの対応も近日中に予定されています。
Tiffany Layne | 2026-02-26